Free Crochet Cat Pattern: Make a Little Gray Cat Amigurumi
Table of Contents
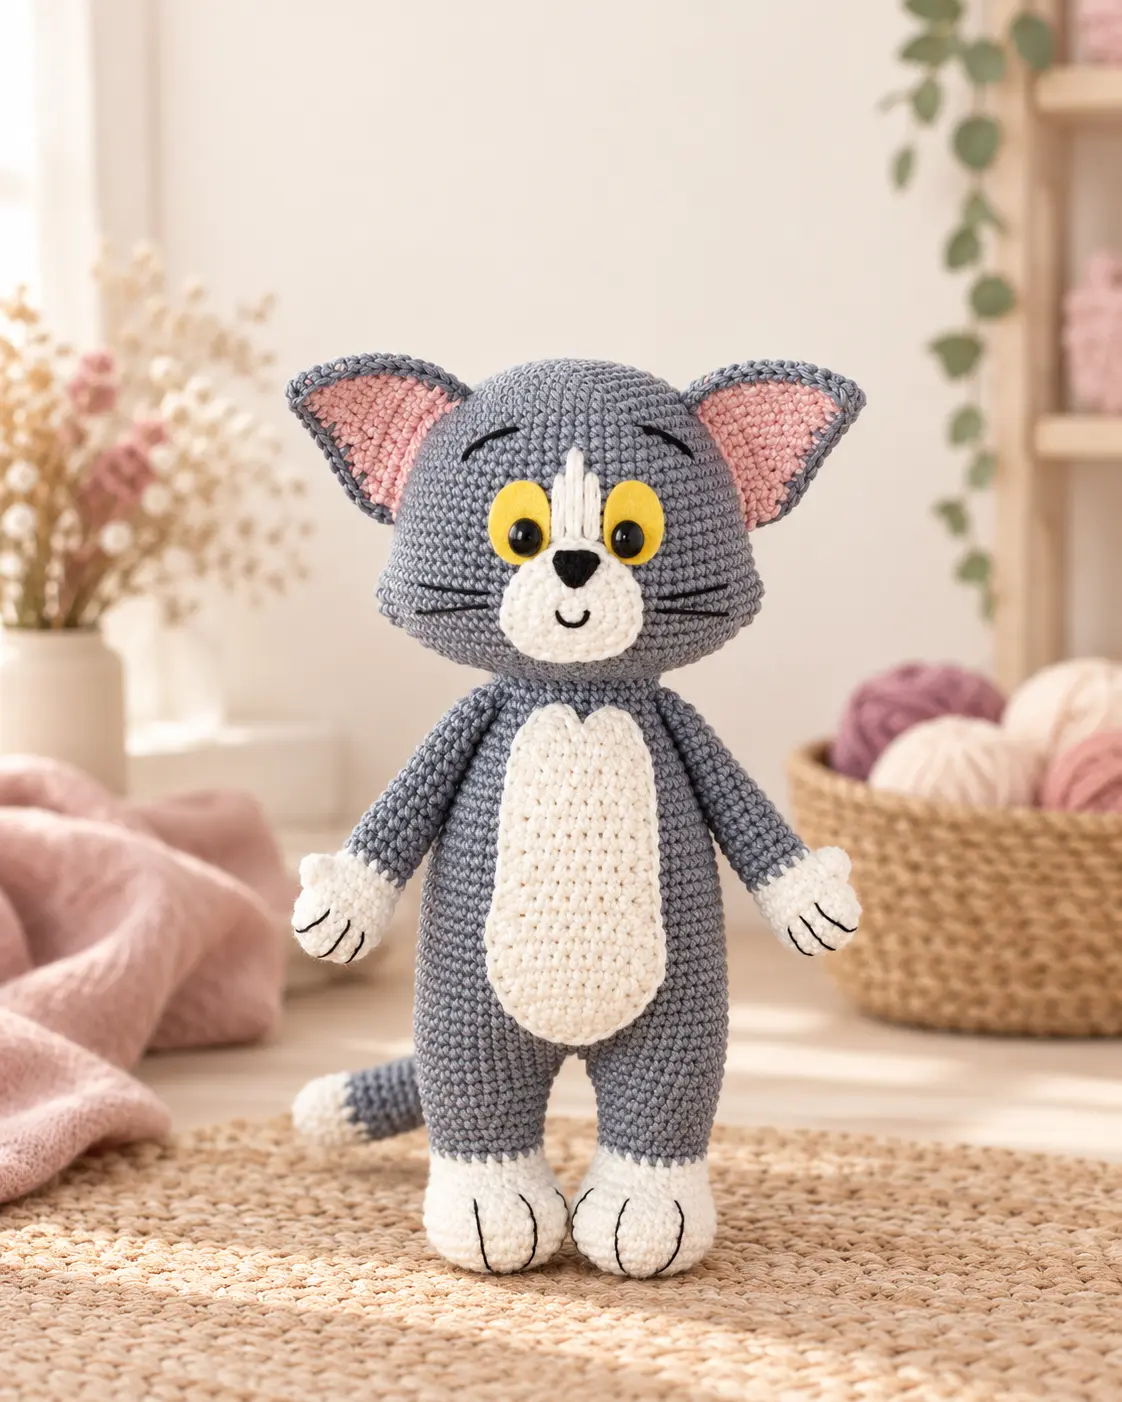
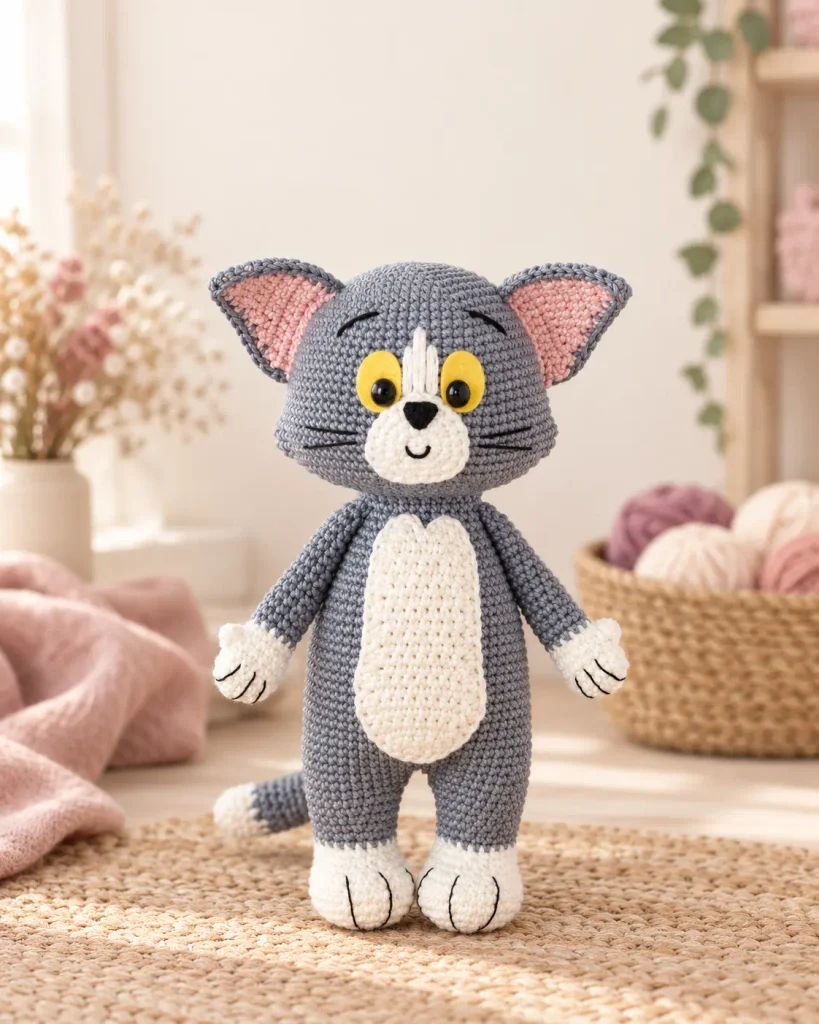
Looking for a soft, characterful project with clear instructions? This free crochet cat pattern guides you through a little gray amigurumi cat with cream paws, a shaped belly, a long tail, and an expressive embroidered face. The complete pattern is written below in US terms, with step photos and practical assembly help.
| Skill level | Confident beginner to intermediate |
|---|---|
| Terminology | US crochet terms |
| Finished size | Approximately 19 cm / 7.5 in with the suggested yarn and hook |
| Hook | 2.0 mm, or the size needed for a dense fabric |
| Yarn | DK or sport-weight smooth cotton/cotton-blend yarn |
| Construction | Continuous rounds, flat pieces, simple sewing, and embroidery |
The design is worked mostly in simple single crochet, but the gentle shaping gives it a polished look. You will make the legs and body as one continuous form, then add the belly, head, muzzle, ears, arms, and tail. Because every part is listed in order, you can use the article as your project checklist from the first magic ring to the final whisker.Jump to the pattern
Materials for This Cat Amigurumi
- Gray DK/sport yarn (similar to Schachenmayr Catania #242)
- Cream yarn (#130), white yarn (#105), and dusty pink yarn (#408)
- 2.0 mm crochet hook, or the size that creates a firm fabric with your yarn
- Two black 6 × 8 mm safety eyes and two yellow felt ovals
- Fiberfill, stitch marker, scissors, pins, yarn needle, and black embroidery thread
Toy safety: Plastic safety eyes are not suitable for children under age three. If this cat is for a baby or toddler, embroider the eyes securely instead. Inspect every seam and yarn tail before gifting.
Crochet Abbreviations
This pattern uses standard US terminology. Numbers in square brackets show the stitch count at the end of the round or row.
MR — magic ring
ch — chain
sc — single crochet
hdc — half double crochet
dc — double crochet
sl st — slip stitch
inc — 2 sc in one stitch
dec — invisible single-crochet decrease
st(s) — stitch(es)
Rnd/Row — round/row
Before You Start
- Work in a continuous spiral unless the instructions say to turn or join.
- Move a stitch marker to the first stitch of every round and count often.
- Use an invisible decrease to keep the amigurumi surface smooth.
- Stuff in small pieces as you work. Keep the tail and any pieces marked “do not stuff” flat.
- Pin every part in place before sewing, then check the toy from the front, side, and back.
Complete Free Crochet Cat Pattern
Gauge note: Exact gauge is less important than creating tight fabric with no visible stuffing. Changing yarn weight or hook size will change the finished size and may change the amount of yarn required.
Legs and Body — Make 2 Legs, Then Join
Start each leg at the foot. Change from cream to gray after Round 12. The torso is worked upward after joining the legs.
Rnd 1With cream (#130), 7 sc in MR. [7]
Rnd 2Inc x 7. [14]
Rnd 3(1 sc, inc) x 7. [21]
Rnd 4(2 sc, inc) x 7. [28]
Rnd 5(3 sc, inc) x 7. [35]
Rnds 6-835 sc.
Rnd 9Dec, 7 sc, 7 dec, 10 sc, dec. [26]
Rnd 1026 sc.
Rnd 117 sc, 4 dec, 9 sc, dec. [21]
Rnd 1221 sc. Change to gray (#242).
Rnd 1321 sc.
Rnd 149 sc, inc, 11 sc. [22]
Rnd 15(10 sc, inc) x 2. [24]
Rnd 1624 sc.
Rnd 17(11 sc, inc) x 2. [26]. Work 6 extra sc and sl st. Fasten off and stuff. Make the second leg the same, but omit the final 6 extra sc and do not cut the yarn.
Rnd 18Continue from the second leg: 17 sc, ch 3, join the first leg, 26 sc around the first leg, 3 sc across the chain, 9 sc around the second leg. [58]
Rnds 19-3858 sc. [58]
Rnd 394 sc, dec, 27 sc, dec, 23 sc. [56]
Rnd 4017 sc, dec, 26 sc, dec, 9 sc. [54]
Rnd 413 sc, dec, 25 sc, dec, 22 sc. [52]
Rnd 42(11 sc, dec) x 4. [48]
Rnd 4348 sc.
Rnd 44(10 sc, dec) x 4. [44]
Rnd 4544 sc.
Rnd 46(9 sc, dec) x 4. [40]
Rnd 4740 sc.
Rnd 48(8 sc, dec) x 4. [36]
Rnd 4936 sc.
Rnd 50(7 sc, dec) x 4. [32]
Rnd 5132 sc. Fasten off and finish stuffing.

Belly Panel
Work back and forth in rows with cream yarn. Leave a long tail so the panel can be sewn neatly to the torso.
Row 1Ch 3. Starting in the second ch from the hook: inc, inc; ch 1, turn. [4]
Row 2Inc, 2 sc, inc; ch 1, turn. [6]
Row 3Inc, 4 sc, inc; ch 1, turn. [8]
Row 48 sc; ch 1, turn.
Row 5Inc, 6 sc, inc; ch 1, turn. [10]
Rows 6-810 sc; ch 1, turn.
Row 9Dec, 6 sc, dec; ch 1, turn. [8]
Rows 10-198 sc; ch 1, turn.
Row 20Dec, 4 sc, dec; ch 1, turn. [6]
Row 21Hdc, dc, ch 2, sl st in next st, sl st in next st, ch 2, dc, hdc. [6]
EdgingWithout cutting the yarn, work 42 sc evenly around the piece. Fasten off with a long sewing tail.
Tail
Begin with the light tail tip, then change to gray. Keep the tail unstuffed so it bends naturally.
Rnd 1With white/cream (#105), 6 sc in MR. [6]
Rnd 2Inc x 6. [12]
Rnds 3-512 sc.
Rnds 6-25Change to gray (#242); 12 sc. Do not stuff. Leave a long sewing tail.
Head
Use gray yarn. Prepare the felt eye pieces before the decrease rounds make the inside difficult to reach.
Rnd 17 sc in MR. [7]
Rnd 2Inc x 7. [14]
Rnd 3(1 sc, inc) x 7. [21]
Rnd 4(2 sc, inc) x 7. [28]
Rnd 5(3 sc, inc) x 7. [35]
Rnd 6(4 sc, inc) x 7. [42]
Rnd 7(5 sc, inc) x 7. [49]
Rnd 8(6 sc, inc) x 7. [56]
Rnds 9-1056 sc.
Rnd 11(7 sc, inc) x 7. [63]
Rnds 12-1363 sc.
Rnd 14(8 sc, inc) x 7. [70]
Rnds 15-1970 sc.
Rnd 20(9 sc, inc) x 7. [77]
Rnd 2177 sc.
Rnd 2217 sc, inc, 38 sc, inc, 20 sc. [79]
Rnd 2317 sc, 2 inc, 38 sc, 2 inc, 20 sc. [83]
Rnd 2418 sc, 2 inc, 40 sc, 2 inc, 21 sc. [87]
Rnd 2518 sc, 2 dec, 40 sc, 2 dec, 21 sc. [83]
Rnd 2617 sc, 2 dec, 38 sc, 2 dec, 20 sc. [79]
Rnd 2717 sc, dec, 38 sc, dec, 20 sc. [77]
Rnd 28(9 sc, dec) x 7. [70]
Rnd 29(5 sc, dec) x 10. [60]
Rnd 30(3 sc, dec) x 12. [48]
Rnd 31(2 sc, dec) x 12. [36]
Rnd 32(7 sc, dec) x 4. [32]. Stuff firmly and leave a long tail for joining.
Muzzle
Use cream or white yarn. Sew the muzzle across approximately Head Rounds 18–26, then embroider the nose, smile, and whiskers.
Rnd 1With cream/white (#105), 6 sc in MR. [6]
Rnd 2Inc x 6. [12]
Rnd 3(1 sc, inc) x 6. [18]
Rnd 4(4 sc, 2 inc) x 3. [24]. Leave a long sewing tail.
Ears — Make 2
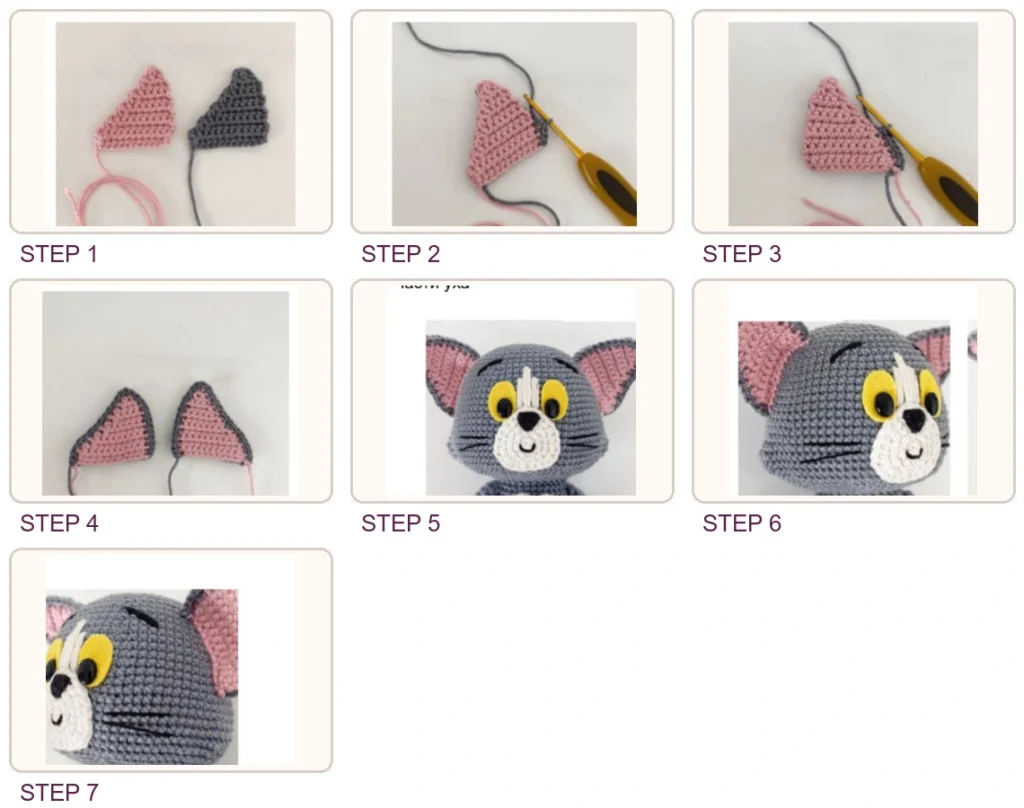
For each ear, make one gray outer piece and one pink inner piece, then join both layers.
Row 1Ch 13. Starting in the second ch from the hook, 12 sc; ch 1, turn. [12]
Row 2Dec, 10 sc; ch 1, turn. [11]
Row 39 sc, dec; ch 1, turn. [10]
Row 4Dec, 8 sc; ch 1, turn. [9]
Row 57 sc, dec; ch 1, turn. [8]
Row 6Dec, 6 sc; ch 1, turn. [7]
Row 75 sc, dec; ch 1, turn. [6]
Row 8Dec, 4 sc; ch 1, turn. [5]
Row 93 sc, dec; ch 1, turn. [4]
Row 102 dec; ch 1, turn. [2]
Row 11Dec. [1]
JoinMake one outer piece in gray and one inner piece in pink. Hold them together and crochet through both layers from the lower edge: 11 sc, 3 sc in the next stitch, 11 sc. [25]. Do not stuff; leave a long sewing tail. Make 2 ears.
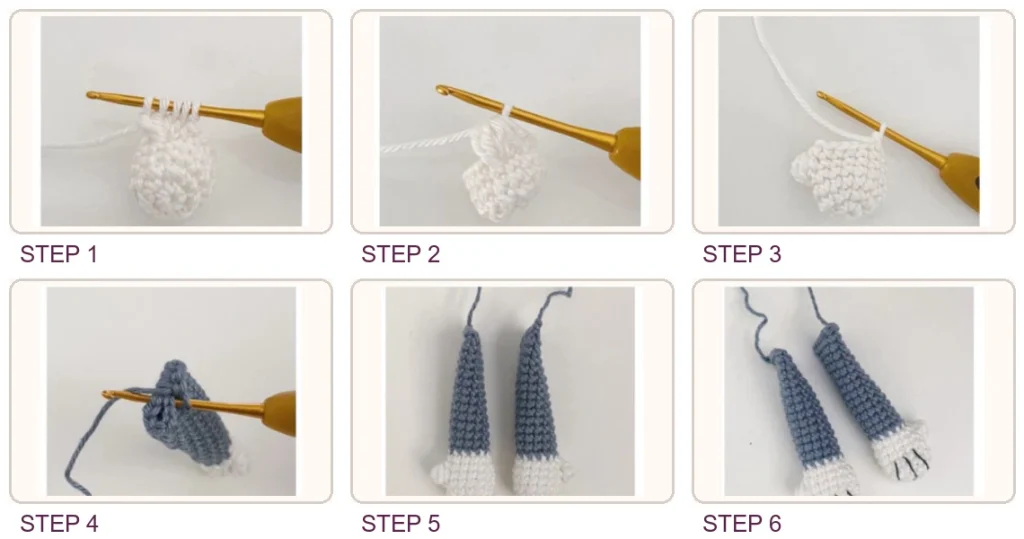
Arms — Make 2
Begin in cream for each paw and continue in gray. The bobble forms a small thumb-like detail.
Rnd 1With cream, 7 sc in MR. [7]
Rnd 2Inc x 7. [14]
Rnds 3-514 sc.
Rnd 64-dc bobble, 13 sc. [14]
Rnd 7(Dec, 5 sc) x 2. [12]
Rnds 8-2112 sc.
FinishStuff only the lower two-thirds. Flatten and crochet 5 sc through both layers to close. Leave a long sewing tail. Make 2 arms.
How to Assemble Your Crochet Cat
- Belly: Center the cream belly on the front of the torso and sew evenly around the edge.
- Head: Pin the head to the 32-stitch body opening. Add stuffing at the neck and sew securely.
- Face: Sew the muzzle in place, then embroider the nose, mouth, brows, and whiskers with black thread.
- Ears: Attach the ears across Head Rounds 5–18, checking symmetry from the front and back.
- Arms: Sew the arms between Body Rounds 49 and 50.
- Tail: Attach the unstuffed tail low on the back and curve it naturally.
- Finish: Hide every yarn tail inside the toy and gently shape the head, paws, and belly.
Neat finishing tip: Use the same yarn color as the piece you are attaching. Take small stitches through the edge loops, tighten gently, and add a little stuffing at the neck before closing the final gap.
Easy Ways to Customize the Pattern
- Swap gray for black, ginger, cream, or a scrap-yarn stripe combination.
- Embroider sleepy eyes instead of using plastic eyes for a nursery-friendly version.
- Add small embroidered cheek marks, spots, or stripes after the head is assembled.
- Use a contrasting tail tip and paw color to make the cat feel unique.
Troubleshooting
| Problem | Likely cause | How to fix it |
|---|---|---|
| Stuffing shows through | Hook is too large or tension is loose. | Use a smaller hook and keep the single-crochet stitches firm and even. |
| Piece twists or leans | A round has an extra or missing stitch. | Count each round and check the bracketed total before continuing. |
| Head feels floppy | The neck needs more support. | Add small pieces of stuffing at the neck as you sew, without overfilling. |
| Face looks uneven | Features were attached without pinning. | Remove the last stitches, pin the pieces symmetrically, and check from several angles. |
| Flat panel puckers | Sewing stitches are too tight. | Loosen the joining thread and distribute the attachment stitches evenly. |
Care and Finishing Check
- Confirm that the head is centered and every attachment feels secure.
- Hide yarn tails inside the toy and close any visible gaps with matching yarn.
- Spot-clean or hand-wash according to the yarn label, then reshape and air-dry fully.
- Never press synthetic yarn directly with an iron. Steam only if the yarn label allows it.
Prefer a Clean Printable Pattern?
Get the organized HooksyLane PDF in US terms, designed for easy reading while you crochet.Get the Printable PDF
Frequently Asked Questions
Can a beginner make this crochet cat?Can I use thicker yarn?Where should the eyes go?Why is my cat smaller or larger than 7.5 inches?Can I sell finished cats made from this pattern?
Your Handmade Cat Is Ready
Give the seams one final check, shape the ears and paws, and your little gray cat is complete. The long body and gentle face make it a sweet handmade gift, shelf companion, or addition to an amigurumi collection.
If this pattern helped you, save it for later and share your finished project with HooksyLane. For another small project, browse our amigurumi patterns and crochet patterns.