Easy Crochet Teddy Bear Pattern: Cute Dressed Teddy Bear Amigurumi
Table of Contents
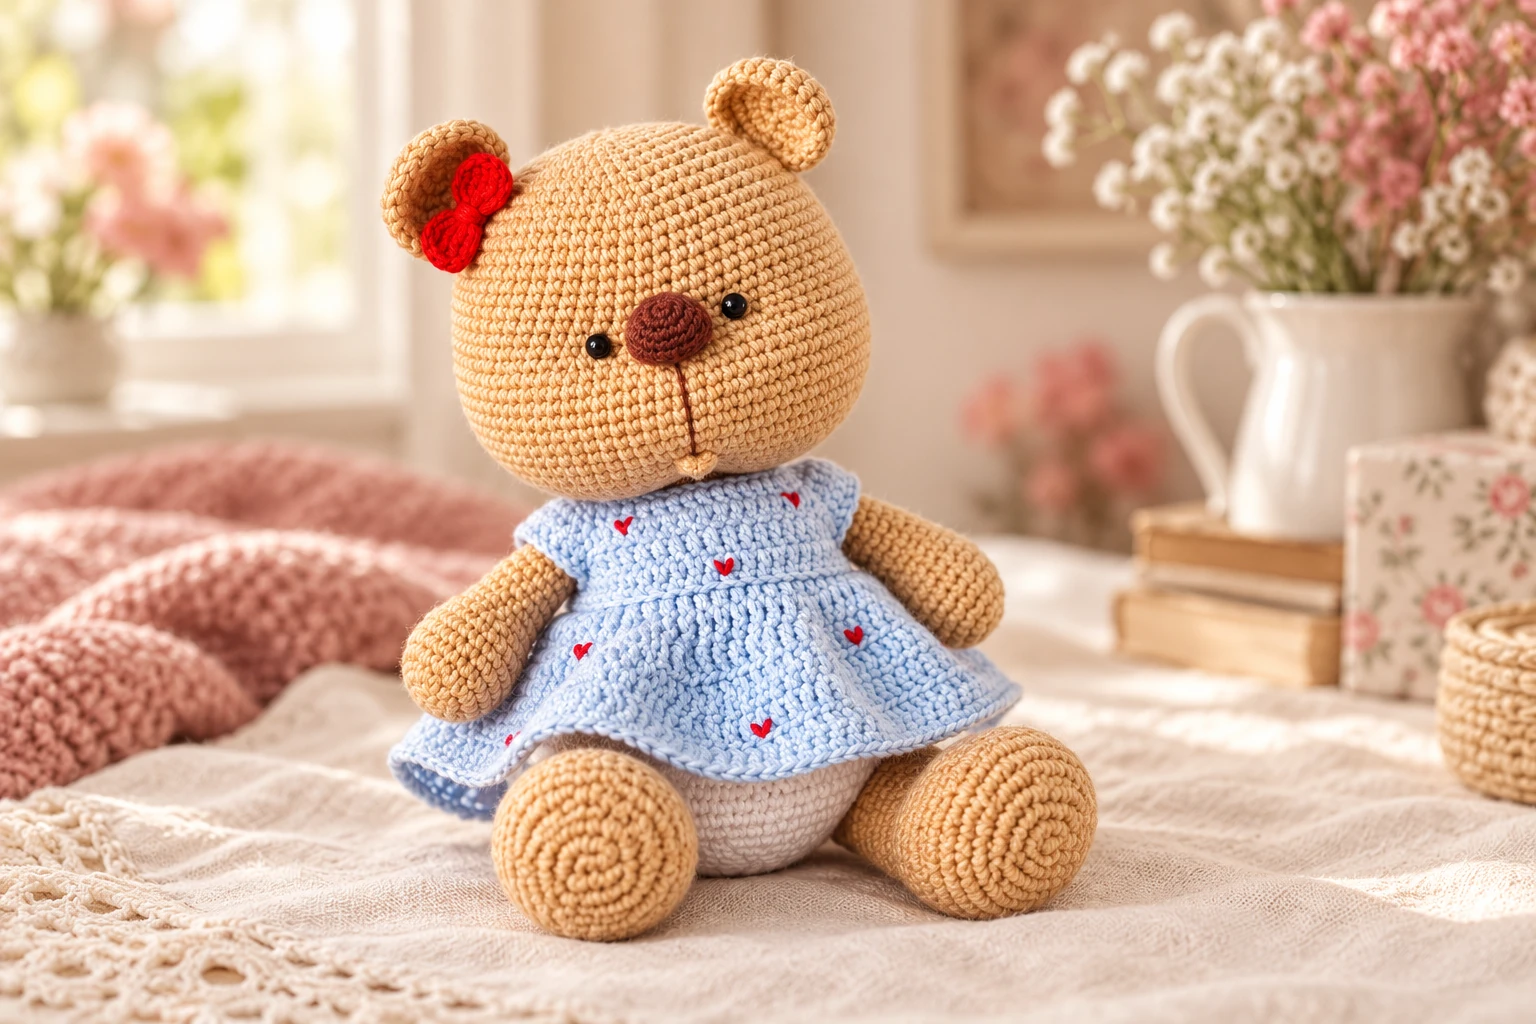
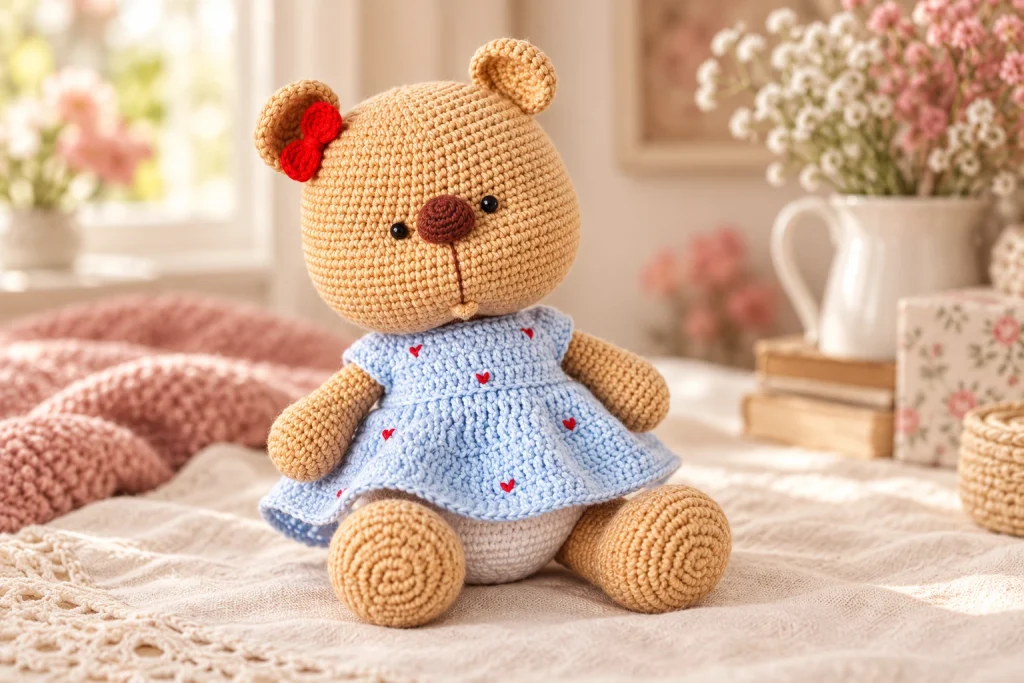
Make a softly shaped crochet teddy bear with integrated limbs, an expressive round face, optional white underwear, and a removable powder-blue dress. This complete pattern uses US crochet terms and includes the practical finishing details that make the bear look balanced, polished, and ready to gift.
What You Will Make
This crochet teddy bear pattern creates a 24 cm (about 9.5 in) amigurumi bear with a generous round head, shaped feet, a small crocheted nose, and a removable buttoned dress. The lower legs and arms are joined while the body is being crocheted, so the finished toy has fewer bulky seams than a fully assembled bear.
Skill levelIntermediate
Finished size24 cm / 9.5 in
TermsUS crochet terms
ConstructionMostly continuous rounds
If this is your first detailed toy, review HooksyLane’s crochet for beginners guides before you start. You can also browse more amigurumi patterns and ideas for help with shaping and assembly.
Materials for the Crochet Teddy Bear
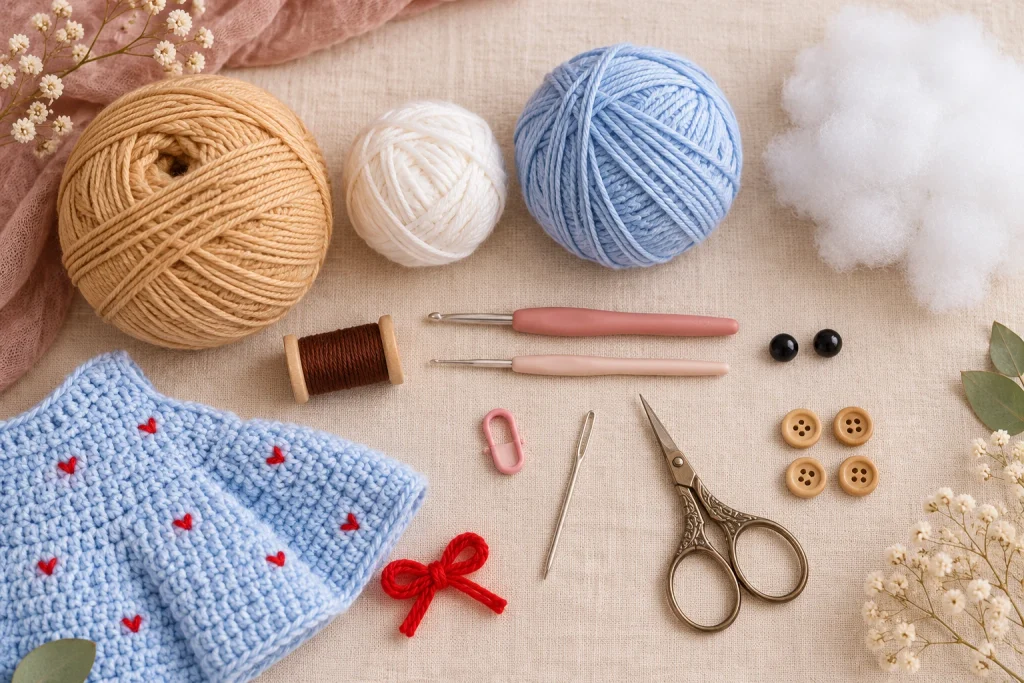
- DK or light sport cotton-blend yarn, approximately 160-165 m per 50 g, in honey tan.
- White yarn for the optional underwear and powder-blue yarn for the dress.
- A small amount of dark-brown fine yarn or embroidery thread for the nose and mouth.
- A small amount of red yarn for the ear bow and tiny heart embroidery.
- 2.0 mm crochet hook for the bear and dress; 1.0 mm hook for the nose.
- Two 6 mm loop eyes, or black thread for embroidered eyes.
- Polyester fiberfill, stitch marker, tapestry needle, pins, scissors, and a slim stuffing tool.
- Four 10 mm buttons for the removable dress.
Safety first: Plastic or glass eyes and small buttons can be choking hazards. For a toy intended for a child under three, embroider the eyes and securely sew or omit removable decorations.
Yarn, Tension, and Skills That Matter
A smooth cotton-blend DK yarn shows the shaping clearly and gives the dress a neat drape. Your fabric should be dense enough to hide the stuffing without becoming stiff. If white filling peeks between stitches, use a smaller hook. If your hands strain or the hook will not enter the stitches comfortably, loosen your tension slightly.
You will use a magic ring, single crochet, double crochet, increases, invisible decreases, slip stitches, back-loop-only and front-loop-only stitches, turning rows, and simple sewing. Mark the first stitch of every round. The marker should remain centered at the back; when shaping pulls it sideways, work an uncounted shift stitch before starting the next round.
Stuffing strategy for a smooth bear
- Fill each foot firmly, but leave the upper leg unstuffed so the hip can bend.
- Stuff only the paw and lower arm; keep the shoulder flat for a neat join.
- Add small pieces of fiberfill instead of one large wad.
- Reinforce the neck firmly, then distribute the head filling in thin layers.
- Stop before the stitches stretch open. More filling does not always create a better shape.
Complete Crochet Teddy Bear Pattern
Abbreviations: MR = magic ring; ch = chain; sl st = slip stitch; sc = single crochet; dc = double crochet; inc = increase; dec = invisible decrease; BLO = back loop only; FLO = front loop only. Numbers in brackets are stitch counts.
Work the bear in continuous spirals unless the pattern says to turn. Use the 2.0 mm hook except for the brown nose, which uses the 1.0 mm hook.
Ears – make 2
- R1: 6 sc in MR [6]
- R2: inc x6 [12]
- R3: (1 sc, inc) x6 [18]
- R4: (2 sc, inc) x6 [24]
- R5: 24 sc [24]. Fasten off with a long tail.
Mouth piece
Leave a 10-15 cm starting tail. Work 4 sc in a magic ring, fasten off, and leave another long tail. The two tails will secure the piece inside the muzzle opening.
Crocheted nose
- R1: 6 sc in MR [6]
- R2: inc x6 [12]
- R3: (1 sc, inc) x6 [18]
- R4: (2 sc, inc) x6 [24]
- R5-7: 24 sc [24]
- R8: (1 sc, dec) x6 [12]. Stuff lightly.
- R9: fold flat and work 6 sc through both layers [6]. Leave a long tail.

Upper arms – make 2
- R1: 6 sc in MR [6]
- R2: inc x6 [12]
- R3: (1 sc, inc) x6 [18]
- R4-9: 18 sc [18]
- R10: dec x6, 6 sc [12]
- R11-21: 12 sc [12]
- R22: 6 sl st, 6 sc [12]. The slip stitches sit above the R10 decreases and mark the inner arm.
Stuff the paw and lower forearm only. Leave the top flat, and place a marker on the inner edge.
Right lower leg and foot
- R1: 6 sc in MR [6]
- R2: inc x6 [12]
- R3: (1 sc, inc) x6 [18]
- R4: (2 sc, inc) x6 [24]
- R5: (3 sc, inc) x6 [30]
- R6: (inc, 1 sc) x3, 18 sc, (1 sc, inc) x3 [36]
- R7-12: 36 sc [36]
- R13: 9 sc, (dec, 1 sc) x6, 9 sc [30]
- R14: 6 sc, (dec, 1 sc) x6, 6 sc [24]
- R15: 3 sc, (dec, 1 sc) x6, 3 sc [18]
- R16: 18 sc [18]
- R17: 6 sl st, 12 sc [18]
- R18-24: 18 sc [18]
- R25: 9 sl st, 9 sc [18]
Stuff the foot firmly but leave the upper leg unstuffed. The final slip stitches mark the inner side.
Left lower leg and foot
- Repeat R1-12 of the right leg.
- R13: 9 sc, (1 sc, dec) x6, 9 sc [30]
- R14: 6 sc, (1 sc, dec) x6, 6 sc [24]
- R15: 3 sc, (1 sc, dec) x6, 3 sc [18]
- R16: 18 sc [18]
- R17: 12 sc, 6 sl st [18]
- R18-24: 18 sc [18]
- R25: 9 sc, 9 sl st [18]
Set both feet side by side. The toes should point forward and both slip-stitch sections should face inward.
Body, integrated legs, and arms
Start in white for optional underwear, or use tan throughout for a solid-color bear.
- R1: 6 sc in MR [6]
- R2: inc x6 [12]
- R3: (1 sc, inc) x6 [18]
- R4: (2 sc, inc) x6 [24]
- R5: (3 sc, inc) x6 [30]
- R6: (4 sc, inc) x6 [36]
- R7: (5 sc, inc) x6 [42]
- R8: (6 sc, inc) x6 [48]
- R9: (7 sc, inc) x6 [54]
- R10: (8 sc, inc) x6 [60]
- R11: (9 sc, inc) x6 [66]
- R12: 12 sc; 9 sc through the left leg and body using one loop of the 9 slip stitches; 24 sc; attach the right leg with 9 sc; 12 sc [66]
- R13: (10 sc, inc) x3, (inc, 10 sc) x3, working through the remaining outer leg loops [72]
- R14-23: 72 sc [72]. Change to tan if making underwear.
- R24: BLO 72 sc for the waistband ridge, or both loops for a solid body [72]
- R25-27: 72 sc [72]
- R28: (dec, 5 sc) x3, 30 sc, (5 sc, dec) x3 [66]
- R29: 66 sc [66]
- R30: (dec, 9 sc) x6 [60]
- R31: 60 sc [60]
- R32: (dec, 8 sc) x6 [54]
- R33-34: 54 sc [54]
- R35: (dec, 7 sc) x6 [48]
- R36-37: 48 sc [48]
- R38: (dec, 6 sc) x6 [42]
- R39: 42 sc [42]
- R40: 7 sc; 6 sc through the first arm and body using one loop of each slip stitch; 16 sc; attach the second arm with 6 sc; 7 sc [42]
- R41: 7 sc; 6 sc through the free arm loops; 16 sc; 6 sc through the free loops of the second arm; 7 sc [42]
- R42: (dec, 5 sc) x6 [36]
- R43: (dec, 4 sc) x6 [30]
- R44: 30 sc [30]. Work R43-44 slightly tighter for a stable neck.
Head and muzzle opening
- R45: inc x30 [60]
- R46: (4 sc, inc) x12 [72]
- R47: 18 sc, (5 sc, inc) x3, (inc, 5 sc) x3, 18 sc [78]
- R48: (12 sc, inc) x3, (inc, 12 sc) x3 [84]. Stuff the upper body.
- R49-51: 84 sc [84]
- R52: 39 sc, skip 6 stitches, 39 sc [78]
- R53: 38 sc, 2 inc, 38 sc [80]
- R54-60: 80 sc [80]
- R61: 20 sc, (dec, 4 sc) x3, dec x2, (4 sc, dec) x3, 20 sc [72]
- R62: 72 sc [72]
- R63: (dec, 10 sc) x6 [66]
- R64-71: 66 sc [66]
- R72: (dec, 9 sc) x6 [60]
- R73: (dec, 8 sc) x6 [54]
- R74: (dec, 7 sc) x6 [48]
- R75: (dec, 6 sc) x6 [42]
- R76: (dec, 5 sc) x6 [36]
- R77: (dec, 4 sc) x6 [30]. Stuff the neck firmly and the head evenly.
- R78: (dec, 3 sc) x6 [24]
- R79: (dec, 2 sc) x6 [18]
- R80: (dec, 1 sc) x6 [12]. Finish with 6 decreases and close the opening.
Use the long mouth-piece tails to secure its four stitches inside the six-stitch opening from R52. Keep it centered and close any small gaps with hidden stitches.
Shape the Face and Finish the Bear

Gentle muzzle sculpting
Mark two lower points between R46-47 at the center front, one stitch apart. Mark two upper points between R62-63, two stitches apart. Pass strong matching thread through the four points in sequence and pull gently. The goal is a soft cheek contour, not a deep indentation.
Nose, mouth, eyes, and ears
- Center the lightly stuffed crocheted nose over the mouth opening and sew with tiny hidden stitches.
- Bring the mouth thread out below the nose and form a short, straight vertical line.
- For 6 mm loop eyes, count about 19 rounds down from the crown and place each eye about two stitches from the nose. Check the face from the front before securing.
- For a young child’s toy, replace hard eyes with compact embroidered eyes.
- Count about nine rounds down from the crown for the ears. Place each ear roughly 11 stitches from the center line and sew across 3-4 rounds.
- Use small hidden yarn stitches for optional eyelids. Attach the red yarn bow securely after the ear is sewn.
Tail
- R1: 6 sc in MR [6]
- R2: inc x6 [12]
- R3-5: 12 sc [12]. Stuff lightly.
- R6: fold flat and work 6 sc through both layers [6].
Sew the tail between Body R19-20, centered at the back.
Removable Crochet Dress Pattern
Use powder-blue DK yarn and the 2.0 mm hook. The yoke is worked flat. In the instructions below, inc means 2 dc in the same stitch; instructions that require 3 dc in one stitch say so explicitly.
- Foundation: ch 51.
- Row 1: from the 4th ch, 48 dc. Ch 2, turn [48]
- Row 2: 7 dc, 3 dc in next st, 8 dc, 3 dc in next st, 14 dc, 3 dc in next st, 8 dc, 3 dc in next st, 7 dc. Ch 2, turn [56]
- Row 3: 8 dc, 3 dc in next st, 10 dc, 3 dc in next st, 16 dc, 3 dc in next st, 10 dc, 3 dc in next st, 8 dc. Ch 2, turn [64]
- Row 4: 10 dc, ch 12 and skip 12 sts, 20 dc, ch 12 and skip 12 sts, 10 dc. Ch 2, turn [64]
- Row 5: BLO 64 dc. Ch 2, turn [64]
- Row 6: 3 dc, inc, (7 dc, inc) x7, 4 dc. Ch 2, turn [72]
- Row 7: 4 dc, inc, ch 1, inc, (7 dc, inc, ch 1, inc) x7, 3 dc. Ch 2, turn [96]
- Row 8: FLO 96 dc. Ch 2, turn [96]
- Row 9: 5 dc, inc, 1 dc, inc, (9 dc, inc, 1 dc, inc) x7, 4 dc. Ch 2, turn [120]
- Row 10: FLO 120 dc. Ch 1, turn [120]
- Row 11: 120 sc. Do not cut the yarn.
First back edge: ch 1, work 22 sc evenly up the edge, ch 1, turn, and work 22 sc back down. Fasten off. Second back edge: join yarn, work sc evenly along the edge, and add four evenly spaced ch-4 button loops. Sew four 10 mm buttons to the opposite band.
Try the dress on before securing the buttons. The back edges should meet without stretching. Embroider each tiny red heart with two short diagonal stitches that meet at a point, carrying the yarn only a short distance on the wrong side.

Troubleshooting for a Cleaner Finish
Head leans
Add firm support at the neck and massage the filling upward before closing. The tighter neck rounds help prevent wobble.
Feet turn sideways
The inner slip-stitch sections were not centered. Pin both legs to the body and confirm toe direction before R12.
Muzzle looks uneven
Compare all four sculpting points from the front. Loosen the shaping thread, reposition it, and tighten in small stages.
Stuffing is visible
Use invisible decreases, reduce the stuffing, or move down a hook size. Do not pull the fabric outward while shaping.
Dress armholes pull
Keep both ch-12 spaces relaxed. If needed, use a slightly larger hook only for the chains.
Button bands gape
Move the buttons inward by one stitch width. If the bands overlap, move them closer to the outer edge.
Customize and Care for Your Bear
Try a cocoa bear with a sage dress, a cream bear with dusty-rose details, or embroidered closed eyes for a sleepy expression. To change the finished size, change the yarn and hook together while keeping every stitch count unchanged. Choose eyes and buttons that suit the new scale.
Spot clean when possible. If every material is washable, remove the dress, place the bear in a laundry bag, use a cool gentle cycle, reshape, and air dry completely. Inspect the face, bow, buttons, seams, and yarn tails before gifting.
For another animal project, try the free crochet cat pattern, the crochet cat amigurumi tutorial, or the baby seal crochet pattern. Browse the complete free crochet pattern library for more ideas.
Keep the Pattern and Find More Inspiration
Save the printable edition in the HooksyLane pattern store, and follow HooksyLane on Pinterest for new crochet projects, tutorials, and seasonal ideas.