Learn to Crochet Flowers with This Simple How-To Guide
Have you ever felt love in every stitch of a handmade gift? Creating crochet flowers lets you express creativity and make something meaningful. Brighten your home decor or add a personal touch to your favorite sweater with this afternoon project.
This comprehensive crochet flower tutorial guides you through each step. You will choose materials, learn the magic ring, and shape petals with ease. You can adapt designs into five- or six-petal patterns for your style.
These clear, sequential instructions build confidence with tension and stitch counts. Soon, simple yarn becomes a stunning, blooming masterpiece that lasts forever.
Key Takeaways
- Master the basics of creating beautiful, handmade botanical designs.
- Learn to adapt patterns for both five and six-petal variations.
- Discover how to manage yarn tension for professional-looking results.
- Explore creative ways to use your finished pieces for gifts or decor.
- Follow a simple, step-by-step process suitable for all skill levels.
Gather Yarn, Tools, and Materials for Crochet Flowers
Creating beautiful crochet flowers starts with materials that fit your design. Your choices affect each bloom’s final look, size, and texture.
Choose yarn weight, fiber, and colors
A yarn’s weight controls the finished scale. Fingering or sport weight makes delicate, small blossoms for jewelry. Worsted weight creates larger, sturdier flowers for home decor.
Fiber choice affects how well your project keeps its shape. Cotton yarn is highly recommended for beginners because it does not stretch and clearly shows stitches. Acrylic blends feel softer and come in many bright colors, making them ideal for playful, decorative arrangements.
Select a crochet hook and supporting tools
Choose a hook size that matches your yarn weight. Most yarn labels suggest a hook size, giving you a useful starting point for your crochet flower projects. For a tighter, more structured flower, use a hook one size smaller than suggested.
Ergonomic hooks are a smart choice when making many flowers. They reduce hand fatigue and help you keep steady tension. Test your tension with a small swatch before starting the full pattern.
Prepare scissors, a yarn needle, stitch markers, and optional embellishments
A few extra tools can make your work much easier. Keep these items in your kit so you are ready for any design:
- Sharp scissors: Necessary for clean yarn cuts.
- Yarn needle: Essential for weaving in ends securely.
- Stitch markers: Helpful for keeping track of your rounds.
- Embellishments: Buttons, beads, or sequins add a professional touch to your crochet flowers.
Match materials to your intended crochet flower project
Your project’s purpose should guide your material choices. A gift topper may need bright, festive colors and durable cotton yarn. For delicate clothing accents, choose soft fibers and smaller hooks to keep the flowers light and flexible.
Always consider the final use when planning your crochet flower projects. Matching materials to the intended result helps your hard work create a useful, beautiful piece. With the right supplies, you are ready to begin your creative journey.
Understand the Basic Construction of Crochet Flowers
Every beautiful floral project begins by learning how stitches form one complete shape. Understanding a bloom’s parts helps you follow any crochet flower tutorial with confidence.
Identify the center, foundation ring, petals, and finishing tail
Most designs begin at the center, which anchors your work. This base is usually a foundation ring made with a magic loop or several chains.
Next, you work the petals outward from the center to create the flower’s unique look. The finishing tail secures the piece and weaves in ends for a polished, professional appearance.
Review the stitches used in the crochet flower tutorial
You will use several basic techniques to build these shapes. Learning these movements helps you turn yarn into delicate, natural forms.
Read crochet flower patterns and recognize common abbreviations
Learning to read crochet flower patterns helps you build your skills. Most instructions use standard abbreviations as shorthand for stitches.
Chain stitch, slip stitch, single crochet, and double crochet
The chain stitch creates the foundation, while the slip stitch joins rounds or moves across the fabric. Single crochet makes dense fabric, while double crochet adds height and graceful length to petals.
Increasing and joining rounds without losing stitch count
Increasing helps create a ruffled or flat petal shape. Working several stitches in one space expands the bloom while keeping each round’s stitch count consistent.
Check gauge and adjust the flower size before beginning
Check your gauge before starting the full project. A small test swatch shows whether your tension is too tight or loose.
If the flower is too small, use a larger hook or thicker yarn. Making these changes early helps your finished piece match the size planned in your crochet flower patterns.
Step 1: Create the Center Ring and Foundation Round
Professional-looking crochet flowers depend on a strong first round. A firm center supports the petals and helps them stand out.
Make a magic ring or chain-based loop
Start with either a magic ring or a simple chain-based loop. Many crocheters prefer a magic ring because you can tighten its center and remove the hole.
Secure the adjustable loop without leaving a large opening
With a magic ring, hold the yarn tail firmly while making your first stitches. Tightening the loop gradually prevents a large, unsightly gap in the flower’s center.
Work the first stitches evenly around the center
When the loop is ready, space your stitches evenly for a balanced base. A quality crochet flower tutorial can help you keep steady tension.
Count stitches and use a marker to identify the round’s beginning
Count your stitches to confirm the pattern’s required number. Place a stitch marker at the round’s start so you can track progress.
Join the foundation round neatly
After making the required stitches, join the round with a slip stitch. This closes the circle and creates a clean center for your flower.
Prevent gaps, twisted stitches, and an uneven flower center
Before pulling the yarn through, check that your stitches are not twisted. Keeping your tension steady prevents gaps and keeps the center flat.
Fasten off or continue directly into the petal round
Depending on your design, you may fasten off to change colors for the petals. Alternatively, continue directly into the next round for a monochromatic look with your crochet flowers.
Step 2: Crochet the Petals and Build the Bloom
This is where your vision for unique crochet flower designs takes shape. You turn a simple foundation ring into a bright, three-dimensional piece of art.
Chain the first petal foundation
First, create a chain for your first petal. It forms the petal’s spine and sets the bloom’s length and reach.
Use consistent chain tension to keep every petal the same size
Consistency is the secret to a professional look. Use the same tension for every chain, keeping each petal uniform. This helps crochet flower accessories look symmetrical.
Work stitches back along the chain to shape the petal
Once your chain is ready, work stitches back toward the center. This builds the petal’s width and volume.
Place increases at the tip for a rounded shape
Place multiple stitches in the final chain at the tip. This gentle increase curves the fabric, creating a rounded edge like a natural petal.
Use shorter stitches near the base for a defined indentation
Work back toward the center with shorter stitches, such as single crochets. This creates a narrow base, helping the petal stand out. It also forms a clear indentation where the petal meets the center ring.
Slip stitch around the center to begin the next petal
After finishing the first petal, make a slip stitch in the next open space on the foundation ring. This anchors the petal and prepares your hook for the next chain.
Repeat the petal sequence around the flower
For each petal, chain and work stitches back toward the center. Your flower will bloom as you repeat these steps around the center.
Count completed petals before closing the round
Before finishing, count your petals. The correct number keeps crochet flower designs balanced, especially when you use them as crochet flower accessories.
Join the final petal and secure the flower’s outer edge
Join the last petal to the base with a secure slip stitch. Fasten off your yarn, leaving a small tail to weave in later, and admire your work.
Step 3: Shape, Finish, and Secure Handmade Crochet Flowers
Giving your handmade crochet flowers a polished look completes the creative process. These details help your work look professional and last longer.
Weave in the yarn ends securely
Secure your yarn tails on the back of the bloom. Use a yarn needle to weave them through the foundation ring or petal bases. Always weave in several directions to prevent unraveling.
Adjust petal spacing and flatten the flower
After hiding the ends, gently pull each petal so they space evenly around the center. Use your fingers to help the fabric lie flat. This simple step improves the look of your crochet flowers.
Use gentle blocking for cotton and other natural fibers
For cotton or wool, lightly mist the flower with water to relax the fibers. Pin it to a blocking mat and let it air dry completely. This creates a crisp, professional finish for high-quality crochet flower decorations.
Shape synthetic yarn carefully without exposing it to high heat
Synthetic yarns like acrylic do not respond to water blocking in the same way. Instead, shape the petals with your fingers while the yarn feels slightly warm from your hands. Avoid high heat, such as a hot iron, because it can melt the fibers and ruin your work.
Add a button, bead, or contrasting center
Personalize your project by adding a decorative element to the center. A small button, shiny bead, or contrasting crocheted center adds depth and character. These additions make your work a unique piece of art.
Attach a felt backing, pin, stem, or clip
To use your creation, first decide how you want to display it. A small felt circle glued to the back creates a clean surface for a pin or hair clip. For a bouquet, insert floral wire through the center and wrap it with green floral tape.
| Attachment Type | Best Use Case | Difficulty Level |
|---|---|---|
| Felt Backing | Brooches and pins | Easy |
| Floral Wire | Bouquets and vases | Moderate |
| Hair Clip | Accessories | Easy |
Inspect the finished bloom for loose ends and uneven stitches
Before finishing, inspect your project quickly. Check for stray yarn ends that appeared during shaping. Confirm that the stitches stay consistent and the flower keeps its intended shape before adding it to your crochet flower decorations.
Explore Crochet Flower Patterns and Design Variations
Expanding your repertoire of crochet flower patterns brings garden color into your home. Learn a few basic techniques, then customize each piece for any style or occasion.
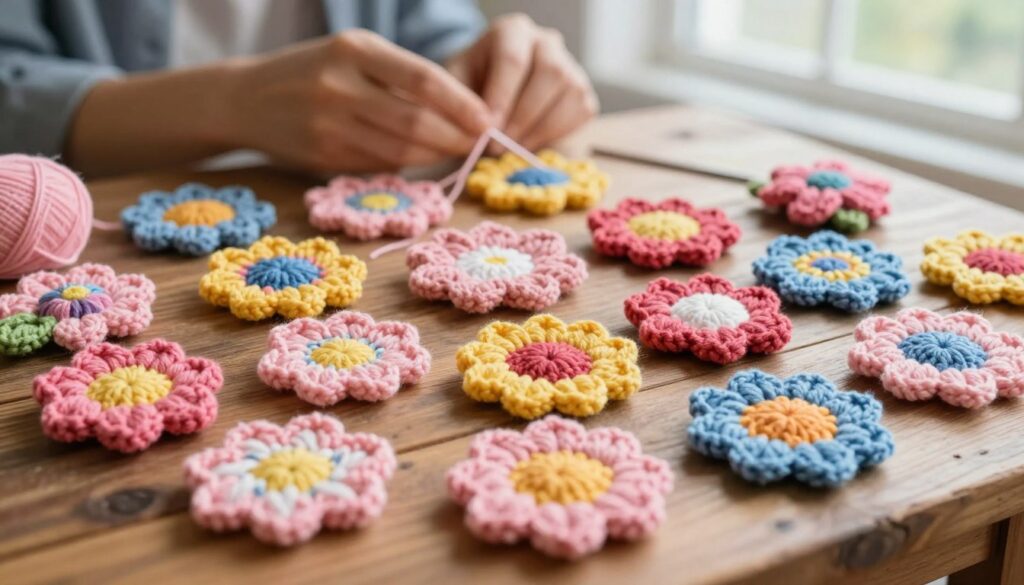
Make simple five-petal and six-petal crochet flower designs
Many crochet flower designs begin with a simple foundation ring. Work stitches into five spaces around the center to make a classic five-petal bloom. Increase the stitch count to create a beautiful six-petal version.
Create layered flowers with different yarn colors
Layering adds depth to your work. Crochet a smaller flower and attach it to a larger base for a stunning 3D effect. Contrasting yarn colors make your crochet flower projects pop with vibrant energy.
Change petal length, width, and texture
Adjusting stitch height can change a bloom’s entire look. Taller stitches, such as trebles, create long, elegant petals, while shorter stitches look compact and dense. These options help you develop unique crochet flower ideas that stand out.
Use scalloped, pointed, ruffled, and raised petals
Try these edge treatments to add detail. Scalloped edges create a soft, rounded look, while pointed petals give a sharp, modern finish. Increase stitches for ruffled textures, or use front-post stitches for a raised, dimensional effect.
Combine small and large blooms in one arrangement
Mixing sizes adds visual interest to any display. Pair a large, bold sunflower-style bloom with several tiny, delicate buds. This method creates balanced crochet flower projects that look professional and intentional.
Adapt the basic pattern for crochet flower ideas at different skill levels
Beginners can start with basic, single-layer designs to build confidence. As you advance, add complex stitches and layered construction to challenge your skills. These flexible crochet flower designs offer a creative outlet at every experience level.
Troubleshoot Common Crochet Flower Problems
Even skilled crafters face problems with detailed crochet flower designs. If your project differs from the pattern, do not worry. Most issues come from tension changes or small counting errors.
Fix petals that curl, flare, or refuse to lie flat
If your petals curl inward, your tension may be too tight, so try a larger hook. If petals flare and look wavy, you may have too many round stitches. Blocking your finished piece with light steam or flat pins can often fix these shape issues.
Correct a flower center that is too tight or too loose
A center that is too tight often results from pulling the magic ring too hard. If the center is too loose, you may not have pulled the tail end firmly enough. Always check your center tension before starting the petal rounds for a balanced look.
Repair uneven petal sizes and inconsistent tension
Inconsistent tension often causes uneven crochet flower designs. Practice a steady rhythm as you work. If one petal looks larger, count your stitches to confirm each section has the same number of loops.
Recover from missed stitches, extra stitches, and twisted rounds
Missed stitches can make your flower look lopsided or incomplete. If you notice a twisted round, the foundation chain probably was not flat before joining. Using stitch markers at each round’s start helps track progress and avoid these common problems.
Choose a different hook or yarn when the flower lacks structure
Sometimes, your chosen materials do not suit the pattern. If your flower feels limp or lacks definition, try a smaller hook for tighter stitches. Firm, high-twist cotton yarn often gives better structure than soft acrylic blends.
Know when to unravel and restart instead of hiding an error
You may want to hide mistakes, but unraveling often leads to better results. If an error affects the symmetry of your crochet flower designs, starting over can save time. Embracing the process of “frogging” helps your final piece look polished and professional.
Turn Crochet Flowers into Decorations and Accessories
Once your blooms are complete, turn them into beautiful items for your home or wardrobe. These versatile pieces show your hard work and add a personal touch to your surroundings. Beginners and experts can find countless ways to use their creations.

Make hair clips, headbands, brooches, and clothing accents
Turn your handmade crochet flowers into stylish fashion statements. Attach a small bloom to a metal clip or stretchy headband for a custom accessory that matches any outfit. Consider these popular options:
- Secure a flower to a pin back to create a unique brooch for your coat or scarf.
- Sew small blossoms onto the cuffs of a sweater for a delicate, vintage-inspired look.
- Use fabric glue to attach flowers to plain hair ties for a quick style upgrade.
Create garlands, wreaths, table décor, and gift toppers
If you want crochet flower decorations, string your finished pieces together. A simple garland can brighten a mantle or a child’s bedroom wall. You can also glue flowers onto a grapevine wreath for a seasonal door display that never wilts.
Build bouquets, potted arrangements, and seasonal displays
One rewarding crochet flower ideas project is building a permanent bouquet. Use floral wire or wooden dowels to create stems that stand upright in a vase. These arrangements make excellent centerpieces for dining tables or office desks.
Attach flowers to bags, hats, blankets, and home accessories
Adding a floral motif to existing textiles can refresh your wardrobe. Stitch a large, vibrant bloom onto a canvas tote bag or sun hat for a charming, custom aesthetic. These crochet flower accessories also look wonderful on baby blanket corners or throw pillows.
Combine handmade crochet flowers with leaves, stems, and vines
To make projects look more realistic, add greenery. Crocheting simple leaves or long, winding vines adds depth and texture to floral arrangements. This detail elevates your work from a simple craft to a professional-looking display.
Use color themes for weddings, holidays, birthdays, and everyday décor
Color choice matters when planning your next project. Adapt your crochet flower ideas to fit any occasion by selecting specific palettes:
- Weddings: Use soft pastels, creams, or monochromatic whites for a classic look.
- Holidays: Choose deep reds and greens for winter, or bright oranges and yellows for autumn.
- Birthdays: Match the recipient’s favorite colors to create a thoughtful, personalized gift.
Experimenting with these crochet flower decorations keeps your handmade items relevant and beautiful. Enjoy adding your yarn art to daily life.
Care for, Gift, and Plan Future Crochet Flower Projects
Caring for your handmade crochet flowers matters as much as stitching them. Good care keeps your hard work bright and strong over time.
Wash and store crochet flowers according to the yarn fiber
Always check your yarn label before cleaning finished pieces. Cotton yarn usually handles gentle hand washing well, while delicate wool may need special care.
After washing, lay your flowers flat on a clean towel to air dry. Avoid hanging them, because water weight can stretch stitches and change the bloom’s shape.
Package finished blooms so petals keep their shape
Presentation matters when you prepare creations as gifts. Place flowers in rigid boxes instead of soft bags, so transit does not crush the petals.
Acid-free tissue paper gives delicate petals extra support. This simple step helps your crochet flower projects arrive as fresh as when you finished them.
Choose beginner-friendly crochet flower projects for handmade gifts
If you are new to gifting, start with simple designs using basic stitches. These shapes help you make quality gifts without complex patterns.
Choose crochet flower patterns that need little assembly to build confidence. Mastering a few core techniques can create beautiful, professional-looking gifts.
Plan coordinated sets using repeated colors and sizes
Plan your color palette first to create a cohesive look. Using the same yarn colors across different crochet flower ideas creates an intentional, polished set.
Make several sizes with the same stitch pattern to add depth. This makes your work look like a curated collection, not a random assortment.
Keep a record of successful crochet flower designs for future projects
A project journal can change your crafting process. Record the yarn brands, hook sizes, and changes used for favorite crochet flower patterns.
Recording your process helps you repeat your best work later. A log of your crochet flower ideas preserves the creative combinations behind successful projects.
Conclusion
Creating beautiful crochet flowers turns simple yarn into intricate art. You can now manage materials, form foundation rings, and shape delicate petals with precision.
Consistent tension and careful stitch counting help you succeed. These habits make projects look professional and keep their shape over time.
Use these techniques to create beautiful crochet flower decorations for your home. These blooms add charm to pillows, wreaths, and seasonal displays.
Your new skills help you design unique crochet flower accessories, such as hair clips and brooches. These handmade items make thoughtful gifts for friends and family members.
Keep exploring new textures by testing yarn fibers from brands like Lion Brand or Red Heart. Try new petal shapes and bright color palettes to keep your creative work fresh.
Your journey into fiber arts grows with every bloom you complete. Build a collection of coordinated sets and enjoy your craft’s endless possibilities.