Crochet Ghost Amigurumi Pattern: Cute Beginner Project
Table of Contents
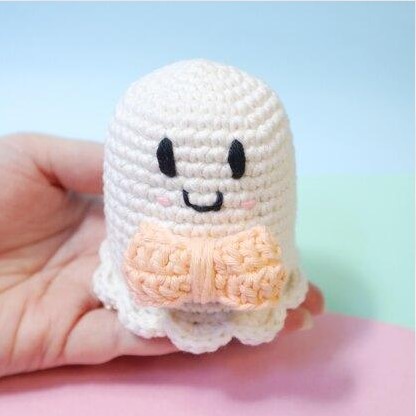
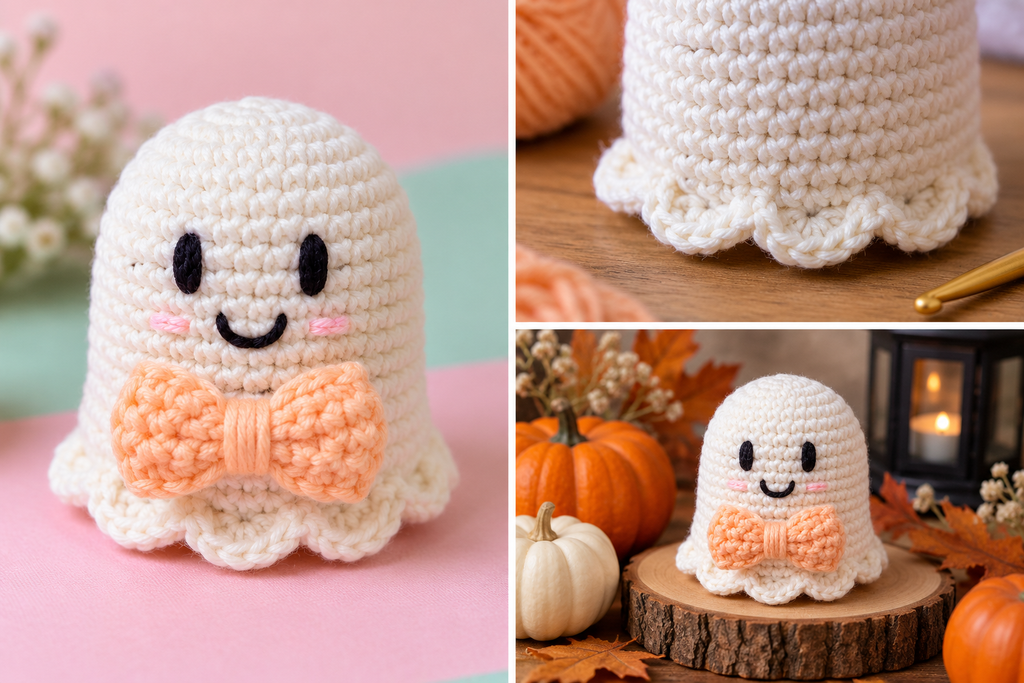
Looking for a crochet ghost amigurumi pattern that is adorable rather than spooky? Meet Bernie, a sweet little white ghost with a rounded head, scalloped bottom, embroidered smile, rosy pink cheeks, and a peach-colored crochet bow.
This easy crochet ghost pattern is a lovely way to practice amigurumi techniques while making something special for Halloween. The head and body are crocheted as one piece, the decorative frill is added to the bottom, and the face is embroidered instead of using plastic safety eyes.
Whether you’re making DIY crochet Halloween decorations, a seasonal gift, or your first small ghost amigurumi, this tutorial walks you through the stitches, shaping, assembly, and finishing details.
Design credit: Adapted with permission from Bernie the Ghost by Cara Engwerda of Cara’s Creations (© 2021). The original design and construction are credited to Cara Engwerda. This HooksyLane tutorial provides rewritten explanations and additional beginner guidance.
Crochet Ghost Amigurumi Pattern: Quick Overview
| Skill level | Easy; beginner-friendly with basic crochet knowledge |
|---|---|
| Terminology | US crochet terms |
| Yarn weight | Aran / worsted / 10-ply |
| Crochet hook | 3.00 mm (US D-3) |
| Finished size | Approximately 8 cm (3.1 in) tall and 7 cm (2.8 in) wide |
| Main techniques | Magic ring, single crochet, increases, decreases, double crochet, slip stitches, back loops only, embroidery |
| Construction | One continuous head-and-body piece, separate scalloped frill, crocheted bow, embroidered face |
The finished measurements come from the original designer’s sample. Your ghost may be slightly larger or smaller depending on your yarn, hook, and tension.
Materials and Supplies
Gather these supplies before starting your beginner crochet ghost:
- White aran/worsted yarn: Less than 25 g for the ghost’s body and frill.
- Orange aran/worsted yarn: Less than 25 g for the decorative bow.
- Pink aran/worsted yarn: Less than 25 g for the embroidered cheeks.
- Black 4-ply yarn or embroidery thread: For the eyes and smiling mouth.
- 3.00 mm crochet hook: US size D-3.
- Polyester toy stuffing: To fill the ghost.
- Tapestry needle: For embroidery, sewing, and weaving in ends.
- Scissors: For cutting yarn.
- Stitch marker: Optional but helpful for tracking rounds.
Yarn Colors Used in the Original Design
Cara Engwerda’s original sample uses Paintbox Yarns Cotton Aran in Light Champagne (603) for the body, Peach Orange (655) for the bow, and Blush Pink (654) for the cheeks.
Cotton yarn gives amigurumi clearly defined stitches. You can substitute a comparable yarn, but avoid mixing dramatically different yarn thicknesses unless you intentionally want a different appearance.
Beginner tip: Amigurumi usually needs a smaller hook than ordinary crochet projects. The goal is a dense fabric that keeps stuffing inside without stretching the stitches too far apart.
Crochet Abbreviations and Stitches
This pattern uses US crochet terminology. Familiarize yourself with these abbreviations before beginning.
| Abbreviation | Meaning |
|---|---|
| MR | Magic ring |
| ch | Chain |
| sc | Single crochet |
| dc | Double crochet |
| inc | Increase: work 2 sc into one stitch |
| dec | Decrease: crochet 2 stitches together into 1 sc |
| 5dc | Work 5 double crochets into the same stitch |
| BLO | Back loops only |
| sl st | Slip stitch |
| sk st | Skip stitch |
| (…) x N | Repeat the instructions in parentheses N times |
| [N] | Total stitch count at the end of a round |
Understanding Continuous Rounds
The ghost’s body is worked in a spiral. Unless instructed otherwise, do not join rounds with a slip stitch or add a turning chain. Place a marker in the first stitch of each round and move it upward as you work.
The bow is different: its double-crochet round is joined with a slip stitch. Pay attention to this distinction when switching between pieces.
Complete Crochet Ghost Pattern
Start with white yarn and your 3.00 mm hook. Keep your stitches firm but comfortable, and check the stitch count at the end of every round.
Part 1: Crochet the Ghost Head and Body
The rounded top is formed with increases. Straight rounds build the ghost’s height, and the final decrease rounds close the underside.
| Round | Instructions | Stitches |
|---|---|---|
| 1 | Make a magic ring and work 6 sc into it. | 6 |
| 2 | Increase in every stitch, 6 times. | 12 |
| 3 | Repeat (1 sc, inc) 6 times. | 18 |
| 4 | Repeat (2 sc, inc) 6 times. | 24 |
| 5 | Repeat (3 sc, inc) 6 times. | 30 |
| 6 | Repeat (9 sc, inc) 3 times. | 33 |
| 7 | Repeat (10 sc, inc) 3 times. | 36 |
| 8–19 | Work 1 sc in every stitch for each of these 12 rounds. | 36 per round |
| 20 | Repeat (8 sc, inc) 4 times. | 40 |
| 21 | Working in BLO, repeat (3 sc, dec) 8 times. | 32 |
| 22 | Repeat (2 sc, dec) 8 times. | 24 |
Stop and stuff the ghost now. Add polyester stuffing gradually, distributing it around the inside of the body. Shape the rounded top gently and avoid packing so much stuffing that the stitches stretch apart.
Continue closing the underside:
| Round | Instructions | Stitches |
|---|---|---|
| 23 | Repeat (1 sc, dec) 8 times. | 16 |
| 24 | Work 8 decreases. | 8 |
Fasten off, leaving enough yarn to close the opening. Thread the tail through your tapestry needle, pass it through the remaining stitches of Round 24, and pull gently to close. Secure and weave in the end.
Important: Round 21 was worked through the back loops only. The unused front loops remain available for the decorative frill. Do not crochet over or remove them.

Part 2: Make the Scalloped Ghost Frill
The frill creates the ghost’s distinctive wavy bottom edge. You will attach white yarn to the front loops left unused in Round 21.
- Turn the completed ghost upside down.
- Locate the unused front loops from Round 21.
- Attach white yarn at the back of the ghost.
- Repeat the following sequence 10 times: sl st, skip 1 stitch, work 5 dc into the next stitch, skip 1 stitch.
- Join with a slip stitch into the initial slip stitch.
- Fasten off and weave in the yarn ends.
Each group of five double crochets forms a rounded shell. Together, the ten shells create a decorative scalloped edge around the ghost.
Beginner tip: Make sure you are crocheting into the unused front loops of Round 21, not the stitches from the final closing rounds. The frill should sit around the lower outside edge of the ghost.
Part 3: Crochet the Peach Bow
The bow is made from a short crocheted tube that is pinched in the center. Switch to orange yarn.
Round 1: Chain 18. Join with a slip stitch to the first chain to form a circle. Make sure the chain is not twisted. [18]
Round 2: Chain 2, then work 1 dc into the same stitch. Work 1 dc into each of the remaining 17 stitches. Join with a slip stitch into the first double crochet. [18]
The beginning chain 2 does not count as a stitch.
Fasten off, leaving a long yarn tail. Flatten the crocheted ring and pinch its center to create two bow loops. Wrap the long tail around the middle approximately six times, as described in the original pattern, then tie it to the beginning tail to secure the shape.
Adjust the two sides gently until the bow looks balanced. Keep the remaining yarn available for attaching it to the ghost.
How to Embroider the Ghost’s Face
The embroidered features give this cute crochet ghost its friendly personality. Use the original round placements as your guide, and check the positioning before securing each thread.
Step 1: Embroider the Smile
Using black yarn or embroidery thread, make a horizontal line between Rounds 11 and 12, spanning two stitches. At each end, embroider a short vertical line extending upward by one stitch.
The result is a small, cheerful smile. Avoid pulling the thread too tightly, which can distort the surrounding crochet fabric.
Step 2: Add the Eyes
Embroider two vertical black eyes spanning Rounds 7–9. Pass the yarn over each eye approximately four times to make the lines thicker.
In the original design, the eyes are positioned one stitch outward from either side of the mouth. Check that both eyes have similar height and thickness.
Step 3: Add Pink Cheeks
Using pink yarn, embroider a short horizontal line on each side of the mouth. Each cheek spans one stitch and sits approximately one stitch away from the mouth.
Keep the pink stitches light and even for a subtle blush effect.
Step 4: Attach the Bow
Position the peach bow on the front of the ghost directly beneath the mouth, leaving two rounds clear between the mouth and bow as specified in the original instructions.
Use the yarn tails and tapestry needle to sew the bow securely to the body. Stitch through the center and attachment area so the bow stays in place without pulling the ghost out of shape.
Weave in the remaining ends and gently arrange the frill. Your little Halloween ghost is complete!
Beginner Tips for a Neat Crochet Ghost
Keep Your Tension Consistent
Uneven tension can make the ghost look lumpy or change its width. Aim for comfortable, consistent stitches rather than pulling every loop as tightly as possible.
Use a Stitch Marker
Continuous rounds can be difficult to track because there is no visible joining seam. Mark the beginning of each round and count your stitches before moving on.
Make Clean Increases and Decreases
An increase places two single crochets into one stitch. A decrease combines two stitches into one. Work them carefully so the rounded top and closed bottom remain smooth.
An invisible decrease can be a useful optional technique for amigurumi, but the original instructions simply specify single crochet decreases.
Prevent Stuffing From Showing
Add small amounts of stuffing at a time. If white fibers are visible through the fabric, check whether your stitches are too loose or the ghost is overstuffed. A smaller hook may help on a future attempt.
Keep the Face Symmetrical
Use the stitch columns and round numbers to guide the eyes and cheeks. You can temporarily mark the intended positions with small pieces of contrasting yarn before embroidering.
Crochet Ghost Troubleshooting
| Problem | Possible Cause and Solution |
|---|---|
| Uneven body | Check the stitch counts and confirm that all increases and decreases were completed in the correct rounds. |
| Visible holes | Stitches may be too loose. Use consistent tension and consider a smaller hook if necessary. |
| Stuffing showing | Remove a little stuffing or distribute it more evenly. Avoid stretching the fabric. |
| Frill curling awkwardly | Check that each shell contains five double crochets and that the skipped stitches are correct. |
| Uneven eyes or smile | Use the original round positions and count stitch columns before tightening the embroidery. |
| Loose bow | Add a few discreet securing stitches through the bow’s center and into the body. |
If your ghost does not look perfect on the first attempt, focus on the stitch counts and construction before changing the pattern. Small variations in tension are normal in handmade crochet.

Creative Ways to Customize Your Halloween Crochet Ghost
Once you understand the original construction, you can experiment with colors and decorative details. The following ideas are optional customizations, not features of Cara Engwerda’s original pattern.
- Pastel ghosts: Try lavender, pale mint, blush pink, or baby blue instead of white.
- Different bow colors: Use pumpkin orange, black, purple, or candy-corn-inspired shades.
- Playful expressions: Experiment with sleepy eyes, a surprised mouth, or a tiny wink.
- Seasonal displays: Arrange several ghosts with crocheted pumpkins, fall leaves, or miniature baskets.
- Mini ghost collection: Use different compatible yarn and hook combinations to explore variations in finished size.
For DIY crochet Halloween decorations, place your finished ghost on a mantel, bookshelf, entryway table, or seasonal display tray. Keep decorations away from open flames and other heat sources.
Frequently Asked Questions
1. Is this crochet ghost amigurumi pattern suitable for beginners?
Yes. The original design is rated easy. It is especially approachable for beginners who already know single crochet and are ready to practice increases, decreases, back-loop stitching, and simple embroidery.
2. What size is the finished crochet ghost?
The original designer’s sample measures approximately 8 cm (3.1 inches) tall and 7 cm (2.8 inches) wide. Your measurements may vary with yarn, hook size, and tension.
3. What yarn is best for a small ghost amigurumi?
The original pattern uses aran/worsted-weight cotton yarn. Cotton is a helpful choice because it provides visible stitch definition and a structured fabric. A comparable yarn may also work, although the final appearance can change.
4. Can I use a different crochet hook size?
Yes, but the original specifies a 3.00 mm hook. Changing the hook can affect the ghost’s size and stitch density. Choose a hook that produces a firm fabric without uncomfortable tension.
5. Do I need plastic safety eyes?
No. This design uses embroidered eyes, a stitched mouth, and pink embroidered cheeks. The facial features are made with yarn or embroidery thread rather than plastic eyes.
6. How do I keep the scalloped edge even?
Follow the original ten-repeat frill sequence carefully. Each repeat uses a slip stitch, a skipped stitch, five double crochets in one stitch, and another skipped stitch. Check that you are working into the unused front loops from Round 21.
7. Can I make this crochet ghost smaller or larger?
You can experiment with different yarn weights and appropriately sized hooks. Keep the original stitch counts and round sequence unchanged if you want to preserve the construction. A different size has not been independently tested for this adaptation.
8. Can I use this ghost for Halloween decorations?
Absolutely. This small Halloween crochet ghost is well suited to decorative shelves, tabletop displays, seasonal arrangements, and handmade gifts. Secure all parts carefully and consider the intended recipient when using the finished item.
Make Your Own Cute Crochet Ghost
With its rounded white body, sweet embroidered face, scalloped hem, and peach bow, Bernie is a charming introduction to Halloween amigurumi. The pattern combines straightforward crochet rounds with a few decorative techniques that are useful for many future projects.
Choose your favorite yarn colors, enjoy the process, and give your little ghost its own personality. For more seasonal inspiration and beginner-friendly crochet ideas, explore the crochet pattern collections at HooksyLane.
Original design: Bernie the Ghost by Cara Engwerda, Cara’s Creations, © 2021. Adapted for HooksyLane with permission as confirmed by the publisher.