Easy Crochet Cat Amigurumi Pattern: Make a Dressed Cat Doll
Table of Contents
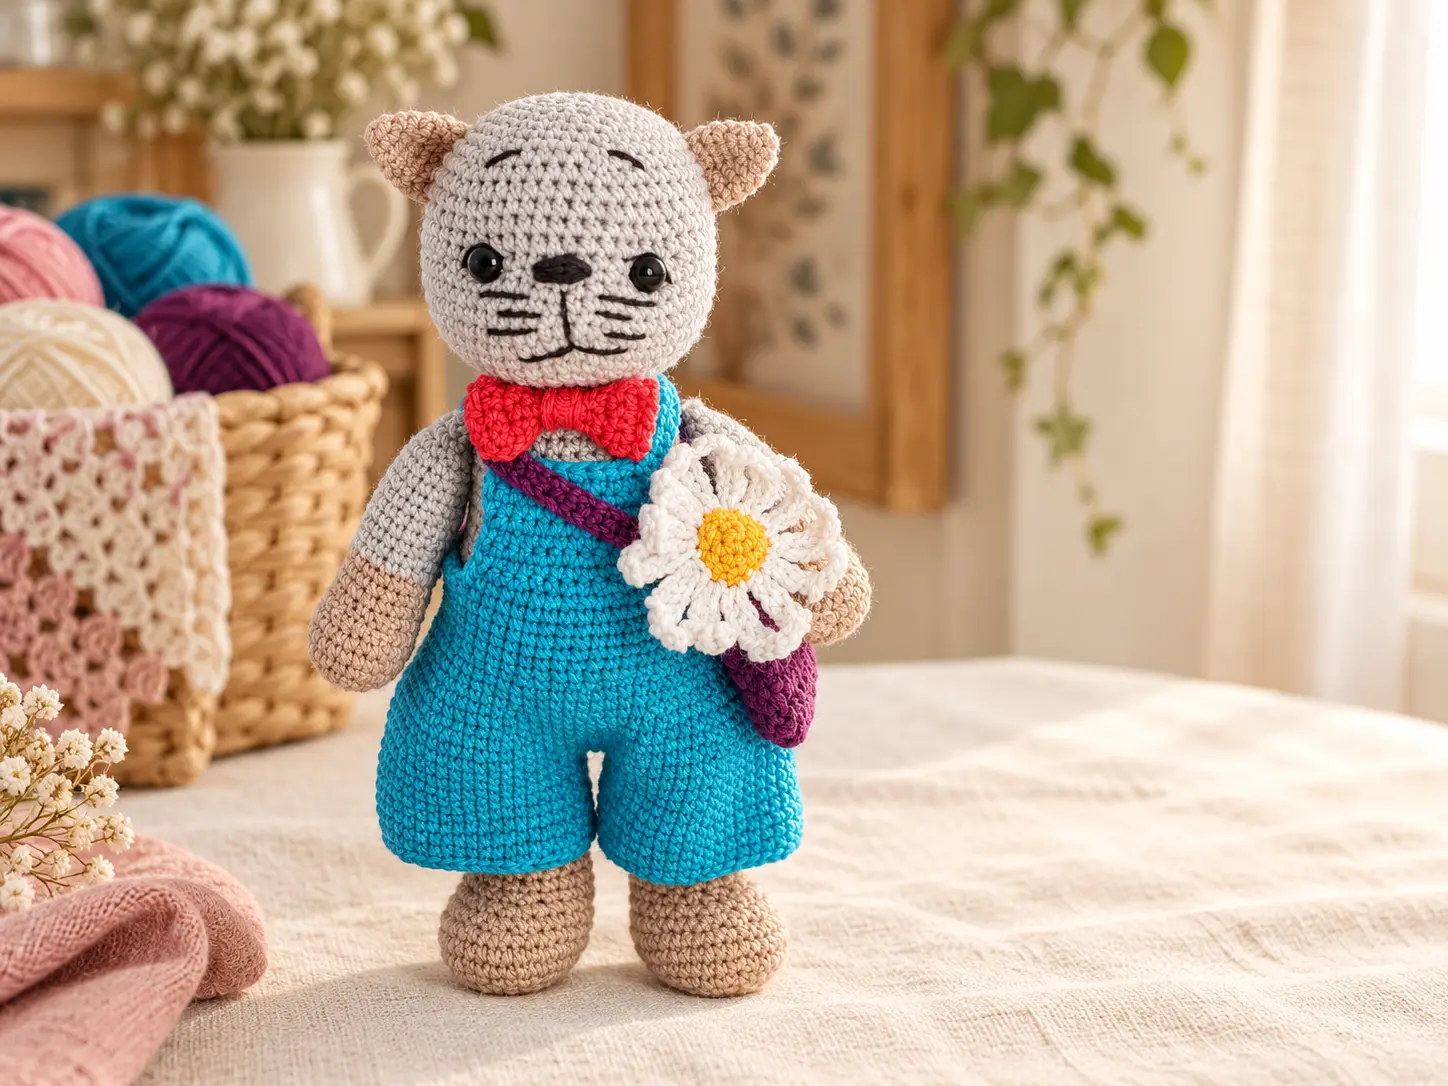
This crochet cat amigurumi pattern creates a charming handmade character with a rounded head, softly shaped paws, embroidered whiskers, striped tail, blue overalls, red bow tie, purple shoulder bag, and a cheerful crochet daisy. The finished cat has enough detail to feel special while still relying on familiar amigurumi techniques.
It is a lovely project for crocheters who want to move beyond a basic animal shape and practice color changes, facial sculpting, joined limbs, and simple doll clothing. The complete round-by-round instructions are kept inside the printable HooksyLane PDF. This article helps you prepare for the project, understand its construction, avoid common problems, and give the finished cat a polished expression.
Project overview: The pattern is written in US crochet terms and makes a cat approximately 10 inches / 26 cm tall with the recommended lightweight cotton-acrylic yarn and 2.5 mm hook. It is best for a confident beginner who is comfortable working in continuous rounds.
Crochet Cat Pattern at a Glance
| Skill level | Confident beginner to intermediate |
|---|---|
| Crochet terms | US terminology |
| Finished size | Approximately 10 inches / 26 cm |
| Main yarn | Lightweight cotton-acrylic amigurumi yarn, such as YarnArt Jeans |
| Hook | 2.5 mm crochet hook |
| Main techniques | Continuous rounds, increases, decreases, color changes, joined limbs, eye sculpting, embroidery, and simple garment construction |
| Construction | Separate head; legs joined into the body; arms and tail crocheted into the body; removable accessories |
Why You Will Love This Crochet Cat Amigurumi
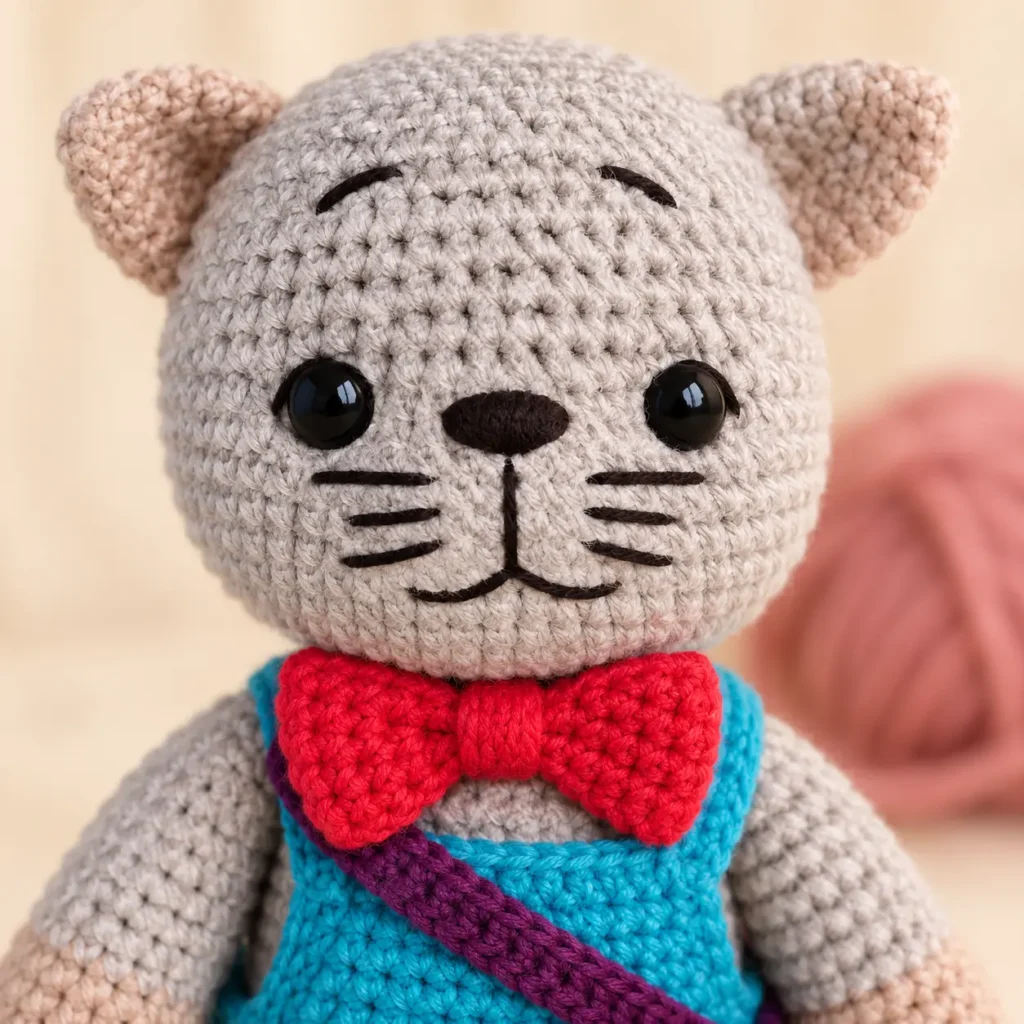
The personality of this crochet cat comes from the small details. A two-color patch adds interest to the head, gentle eye sculpting creates expression, and simple embroidered lines form the eyelids, eyebrows, mouth, and whiskers. The finished face looks more dimensional than a basic amigurumi face without requiring complicated stitches.
The construction is also practical. The legs flow directly into the body, and the flattened arms and tail are joined while you crochet. That reduces the amount of sewing and helps the limbs sit evenly. Once the cat is complete, the overalls, bow tie, bag, and flower turn it into a full character rather than just another crochet animal.
For more handmade animal inspiration, browse the HooksyLane amigurumi collection.

Materials for the Crochet Cat Doll
- Light gray yarn for the main cat color
- Beige yarn for the paws, feet, ears, and facial marking
- Blue yarn for the overalls
- Purple yarn for the shoulder bag
- Red yarn for the bow tie
- Green, yellow, and white yarn for the daisy
- Small amounts of black, white, and gray yarn or embroidery thread for facial details
- 2.5 mm crochet hook
- Two 12 mm safety eyes, or embroidery thread for child-safe eyes
- Polyester fiberfill
- Blunt yarn needle for assembly
- Long doll or sculpting needle for shaping the eyes
- Stitch marker or a short piece of contrasting yarn
- Scissors and sewing pins
Choosing the Best Yarn
The original project uses YarnArt Jeans, a smooth cotton-acrylic yarn that gives amigurumi stitches clear definition. You can substitute another lightweight yarn with a similar thickness and texture. Smooth yarn is especially useful for this project because it makes the contrast-color patch, embroidered face, and overalls easier to see.
Before substituting, compare the yarn thickness rather than relying only on the name printed on the label. The Craft Yarn Council’s standard yarn weight system is a useful reference, but yarns within the same category can still behave differently.
Can You Use a Different Hook Size?
Yes. Use the hook that gives you a firm fabric without large gaps. If fiberfill shows between the stitches, try a smaller hook or tighten your tension slightly. If the fabric feels stiff and difficult to work, move up by 0.25 or 0.5 mm.
Changing the yarn or hook will also change the finished size. Keep the same hook and tension for the cat and its clothing so the overalls fit correctly.
Skills to Know Before Starting
This cat amigurumi pattern uses standard US crochet terms. The main skills include:
- Starting with a magic ring
- Working single crochet in continuous spirals
- Making single crochet increases and decreases
- Changing colors within a round
- Joining two legs into one body
- Crocheting flattened limbs into a body round
- Working simple rows for accessories
- Sculpting around safety eyes
- Embroidering facial details
- Seaming and attaching crochet pieces
If you need a terminology refresher, the Craft Yarn Council crochet abbreviation list explains the standard US abbreviations used in published patterns.
How the Crochet Cat Is Constructed
The article does not reproduce the full round-by-round PDF. Instead, this section explains how the pieces fit together so you can begin the printable pattern with a clear plan.
1. Crochet the Head and Color Patch
The head begins at the crown and expands to form a rounded shape. After several even rounds, carefully placed decreases create gentle shaping around the face. The safety eyes are inserted before the opening becomes too small to reach.
A second yarn color is introduced on one side of the head to create the cat’s marking. Keep both yarns relaxed while changing colors. If the unused yarn is pulled too tightly across the inside, the head may pucker. If the floats are too loose, they can catch on the stuffing.
2. Shape and Embroider the Face
After the head is stuffed, a long needle and matching thread are used to create shallow indentations around the eyes. This step gives the face more depth and helps the eyes sit naturally instead of appearing to float on the surface.
The eyelids and eyebrows are embroidered above the eyes. Repeated stitches build the nose, while small straight stitches form the mouth and whiskers. Work slowly and compare both sides before tying the final knots.
3. Make the Ears, Arms, and Striped Tail
The ears begin as small cones, then fold twice to create a compact shape with natural depth. Pin both ears to the head before sewing. Look at the cat from the front, back, and side to confirm that the height and angle match.
The arms start in the contrast color and change to the main gray yarn. The tail alternates between contrast and main colors to create soft stripes. Both the arms and tail are flattened at the top, making them easy to crochet directly into the body.
4. Crochet Two Legs and Join the Body
Each leg begins at the foot. Strategic decreases shape the toe before the yarn changes to the main body color. The first leg is fastened off, but the second remains attached to the working yarn. A short chain connects the legs, and crochet continues around both pieces to form the lower body.
Check that both feet face forward before completing the join. A twisted connection can be difficult to correct after several body rounds have been worked.
5. Add the Tail and Arms While Crocheting
The flattened tail is held against the body and crocheted through both layers at the designated position. The arms are added in the same way near the top of the body. This technique creates a strong join and reduces the amount of finishing later.
Before securing each limb, lay the project flat and confirm the placement. The arms should align with each other and sit parallel to the legs.
6. Sew the Head to the Body
The neck opening is narrowed and left with a long sewing tail. Add the final stuffing, center the head over the body, and pin it in several places. Sew around the neck in small stitches, adding a little extra fiberfill before closing the last gap if the head feels unstable.
How to Create a Balanced Amigurumi Cat Face
The face is the first thing people notice, so it is worth spending extra time on placement. These tips help create a balanced expression:
- Insert the eyes only after confirming the center front of the head.
- Count the stitches between the eyes instead of judging the distance by sight.
- Add eye sculpting gradually; pulling too hard can distort the head.
- Use pins or temporary thread to test the eyebrow and mouth positions.
- Build the nose with several light layers instead of one bulky stitch.
- Make the whiskers from small straight stitches rather than long loose strands.
- View the face from arm’s length before securing the embroidery.
HooksyLane tip: Take a quick phone photo of the face before tying the embroidery knots. A photo makes small spacing differences easier to notice than looking at the project in your hands.
Tips for Neat Color Changes
The head, arms, tail, and feet use more than one color. For a clean transition, begin the final single crochet before the color change with the old color, but complete its last yarn-over with the new color. The next stitch will start in the new shade without an obvious horizontal bar.
When the color section is short, carry the unused yarn loosely across the inside. For longer sections, cut the yarn and rejoin it later to avoid bulky floats. Always leave enough length to secure the tails before stuffing.
Making the Cat’s Clothes and Accessories
Crochet Overalls
The overalls begin with two tubular trouser legs. They are joined with a short chain, then shaped through a series of decreases. A small opening allows the tail to pass through the back. The bib is worked in turning rows, and two narrow straps cross behind the cat.
Try the overalls on before finishing the straps. Amigurumi tension varies, so the ideal strap length depends on the exact width and firmness of your cat. The clothing should fit securely without compressing the body.
Red Bow Tie
The bow tie is a small rectangle made in turning rows. A reverse single crochet edging, often called crab stitch, gives the outer edge a tidy finish. Wrapping yarn around the middle transforms the rectangle into a bow.
Purple Shoulder Bag
The bag begins as a simple rectangle. It is folded, seamed along the sides, and turned so the seam sits inside. A narrow strap is worked from one edge and sewn to the opposite side. Adjust the strap length before fastening off so the bag rests naturally across the cat’s body.
Crochet Daisy
The daisy combines a small green stem, two yellow center pieces, and long white petals. Use even tension on the petal chains so they curve consistently. Sew the second yellow circle over the center to hide the petal joins, then attach the stem securely at the back.
Stuffing and Assembly Tips
Add Fiberfill in Small Pieces
Small pieces distribute more evenly than one large clump. Fill the feet and paws first, then build the shape gradually. Overstuffing can stretch the stitches and make the toy feel rigid.
Pin Before Sewing
Use several pins to hold the head and ears in place. Rotate the cat and inspect it from every direction. It is much easier to move a pinned piece than to remove a finished seam.
Use a Strong Invisible Seam
Take small stitches through full crochet stitches rather than catching only one strand of yarn. Pull the seam snug after every few stitches, but do not tighten it enough to create a dent.
Hide Yarn Tails Deeply
Pass each tail through the stuffed body and bring it out a short distance away. Pull gently, trim close to the surface, and massage the fabric so the end disappears inside.
Common Problems and How to Fix Them
The Head Looks Lopsided
Check the stitch count at the end of every round, especially around the color changes and decreases. Uneven stuffing can also distort the shape. Add or redistribute small pieces of fiberfill before closing the head.
The Color Patch Has Jagged Edges
A slight step is normal in spiral crochet. Make every color change on the final yarn-over of the stitch before the new color begins. Keep the carried yarn relaxed and avoid tightening the first stitch excessively.
The Eyes Are Uneven
If the safety-eye backs have not been attached, remove and reposition the eyes. If they are already secured, careful eye sculpting and eyelid embroidery can improve the balance. Avoid pulling one side more tightly than the other.
The Legs Twist After Joining
Before crocheting the first complete body round, place the project on a flat surface and point both feet forward. If the join is twisted, undo it immediately. Continuing will lock the legs in the wrong position.
The Arms Sit at Different Heights
Pin both flattened arms to the body before reaching the attachment round. Count the body stitches between them and compare their positions with the feet. If needed, shift one arm by a stitch while keeping the round’s total count unchanged.
The Overalls Are Too Tight
Tension differences are the usual cause. Try the clothing on during construction. If the fabric does not stretch comfortably around the body, use a hook 0.25-0.5 mm larger for the outfit or add evenly distributed stitches while preserving the overall shape.
The Overalls Slip Down
Shorten the shoulder straps and cross them firmly at the back. You can also add one small hidden stitch between the bib and the cat’s body if the outfit is intended to remain permanently in place.
Ways to Personalize Your Crochet Cat Doll
- Use cream, ginger, black, or brown yarn for a different cat coat.
- Move or reshape the contrast patch to create unique markings.
- Make the overalls in denim blue, sage green, dusty rose, or mustard yellow.
- Add embroidered freckles or a tiny heart to the bib.
- Replace the daisy with a small sunflower or seasonal flower.
- Make a longer bag strap or add a tiny button to the flap.
- Use smooth cotton for a firm display doll or soft acrylic for a cuddlier finish.
Keep notes whenever you change yarn, hook size, or stitch counts. That will make it easier to repeat a favorite version later.
Amigurumi Safety and Care
If the crochet cat is intended for a baby or a child under three, embroider the eyes instead of using plastic safety eyes. Secure every attachment and yarn tail inside the toy. The bag, bow tie, and flower are separate accessories and may not be suitable for very young children.
Spot cleaning is the safest option for preserving the shaping and accessories. If the yarn label permits washing, place the cat inside a mesh laundry bag, use cool water and a gentle cycle, then reshape and dry flat. Do not tumble dry unless the yarn manufacturer specifically allows it.
Crochet Cat Amigurumi FAQs
Is this crochet cat pattern suitable for beginners?
It is best for a confident beginner. You should already know single crochet, increases, decreases, continuous rounds, and basic sewing. The color changes, eye sculpting, joined limbs, and clothing make it more detailed than a first amigurumi project.
Is the pattern written in US crochet terms?
Yes. The HooksyLane printable edition uses standard US crochet terminology and includes a clear abbreviation guide.
How large is the finished crochet cat?
With the recommended lightweight yarn and 2.5 mm hook, the cat is approximately 10 inches / 26 cm tall. Yarn thickness, hook size, tension, and stuffing can change the final measurement.
Can I make the cat with cotton yarn?
Yes. A smooth cotton or cotton-acrylic yarn works well and gives the facial embroidery and colorwork clear definition. Choose a hook that creates dense fabric without visible gaps.
Are the overalls removable?
They can remain removable if you do not stitch them to the body. Make sure the tail opening and straps fit comfortably before fastening off.
Can I embroider the eyes instead of using safety eyes?
Yes. Embroidered eyes are recommended when making a toy for a child under three. Mark both eye positions first and use several secure stitches to create matching shapes.
Do I need to sew on all the limbs?
No. The legs are joined into the body, and the flattened arms and tail are crocheted into designated body rounds. The head and ears require sewing.
Can I sell a finished cat made from this pattern?
Follow the usage terms included in the printable PDF and credit the original designer where required. Do not copy, resell, or redistribute the pattern itself.
Make Your Own Dressed Crochet Cat
This crochet cat is a satisfying character project because every stage adds something new. The contrast patch builds the coat pattern, facial sculpting creates expression, the joined limbs simplify assembly, and the handmade outfit gives the finished doll its personality.
Take time to count the rounds, test every placement with pins, and try on the overalls before finishing the straps. The printable HooksyLane PDF contains the complete round-by-round crochet cat amigurumi pattern, US abbreviations, instructional photographs, clothing directions, and finishing guidance in a clean format you can keep beside you while crocheting.
Ready to Make the March Cat?
Get the complete printable HooksyLane pattern with US crochet terms, photo guidance, accessories, and every round from start to finish.
Get the Crochet Cat PDF Pattern
Pattern note: This HooksyLane English-US edition is based on an authorized source pattern. Original design credit is retained in the printable PDF.