
Crochet Angel Pattern: Christmas Ornament and Gift
Table of Contents
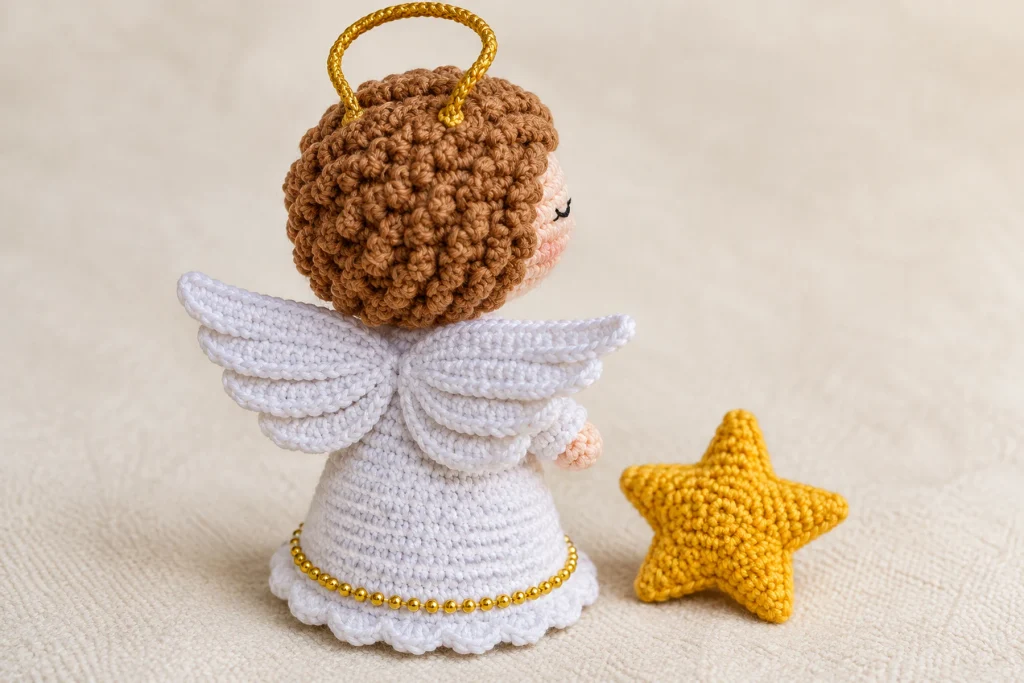
This crochet angel pattern makes a graceful Christmas amigurumi with a shaped white gown, peaceful embroidered face, textured crochet hair, layered wings, golden star and halo. The finished angel works as a meaningful handmade gift, mantel decoration, memorial keepsake or tree ornament when made in lighter yarn. This complete tutorial uses US crochet terms and adds corrected stitch counts, careful assembly, safer halo options, gifting ideas, troubleshooting and finishing guidance.

Crochet Angel Pattern at a Glance
- Skill level: Adventurous beginner to intermediate.
- Finished size: Approximately 6-7 in / 15-18 cm tall in sport-weight cotton.
- Construction: The gown and head are crocheted as one piece; hair, arms, wings and star are made separately.
- Main techniques: Magic ring, spiral rounds, BLO texture, increases, invisible decreases, short turned rows, embroidery and sewing.
- Suggested hook: US C/2 / 2.5 mm, or the size that creates a firm fabric.
- Estimated time: About 6-9 hours, depending on experience and finishing choices.
- Gift uses: Christmas keepsake, memorial angel, baptism gift, hostess gift, mantel decor or tree ornament.
Why a Crochet Angel Makes a Meaningful Christmas Gift
An angel is more than a seasonal character. It can represent peace, remembrance, hope and family tradition, which gives this project lasting value after the holiday decorations are packed away. The star offers a clear Christmas detail, while the neutral white, warm brown and gold palette works with traditional, rustic and modern decor.
The pattern also gives you several ways to personalize the gift without changing the main construction. Match the hair shade to the recipient, embroider an initial or year beneath the wings, choose a muted champagne star for elegant decor, or use the recipient’s favorite color for the gown. For a memorial keepsake, add a small fabric tag with a name and date to the back instead of placing text on the front.
Materials

- Sport or 4-ply cotton yarn in white for the gown, sleeves and wings.
- Sport-weight cotton in a skin tone.
- Sport-weight cotton in chestnut brown or your chosen hair color.
- Sport-weight cotton in golden yellow for the star.
- Fine metallic gold thread or gold crochet cord for the halo and optional trim.
- Black embroidery floss for the closed eyes; optional pink floss for subtle cheeks.
- US C/2 / 2.5 mm crochet hook.
- Polyester toy stuffing.
- Stitch marker, yarn needle, embroidery needle, pins, scissors and stuffing tool.
- Optional removable flat insert for adult display only; use thick washable plastic canvas rather than a sharp lid.
- Optional flexible craft wire for an adult-only display halo, or use the wire-free halo described below.
Shop Crochet Essentials
Explore useful tools, colorful yarn and books for your next project.
As an Amazon Associate, I earn from qualifying purchases.
Yarn, Gauge and Size
Exact gauge is not essential, but the stitches must be tight enough to conceal the stuffing. A smooth mercerized or matte cotton gives the star and wing rows enough structure. If stuffing shows between stitches, move down 0.25-0.5 mm. If your hands strain or the fabric feels board-like, move up one hook size. Use the same yarn weight for the gown, head, arms and hair; a slightly finer metallic thread can be held together with yellow yarn for the halo.
Changing yarn weight changes the finished size. Fingering-weight yarn can produce a light ornament, while DK yarn makes a larger shelf figure. Always change the hook proportionally and remember that a larger angel needs more internal support and stronger attachment stitches.
US Crochet Abbreviations
| Abbreviation | US meaning |
|---|---|
| MR | magic ring |
| ch | chain |
| sl st | slip stitch |
| sc | single crochet |
| dc | double crochet |
| inc | 2 sc in the same stitch |
| dec | single crochet 2 stitches together; invisible decrease recommended |
| BLO | work in the back loop only |
| FLO | work in the front loop only |
| st(s) | stitch(es) |
| R | round |
| Row | turned row |
| FO | fasten off |
Important Pattern Notes and Corrections
- Work the gown and head in continuous spirals. Move the marker after every round.
- The original source labels R27 and R28 as decreases, but the stitch totals rise from 24 to 30 to 36. They are corrected here as increase rounds.
- R7 is worked BLO so the unused front loops can support the decorative hem later.
- Add stuffing gradually. The narrow neck needs firm support, while the face should remain softly rounded.
- The hair is worked BLO to leave visible front loops. Those loops are used for the curl texture.
- The wings are mirrorable. Make both from the same instructions, then flip one before pinning.
- For a child’s toy, omit wire, loose beads and removable base pieces. Use embroidered eyes and the wire-free halo.
Complete Crochet Angel Pattern
Gown, Neck and Head
R1: With white, work 6 sc in a MR. [6]
R2: Inc in each st around. [12]
R3: (Sc, inc) 6 times. [18]
R4: (Sc in next 2 sts, inc) 6 times. [24]
R5: (Sc in next 3 sts, inc) 6 times. [30]
R6: (Sc in next 4 sts, inc) 6 times. [36]
R7: Working BLO, sc in each st around. [36]
R8-9: Sc in each st around. [36]
R10: (Sc in next 10 sts, dec) 3 times. [33]
R11: Sc in each st around. [33]
R12: (Sc in next 9 sts, dec) 3 times. [30]
R13: Sc in each st around. [30]
R14: (Sc in next 8 sts, dec) 3 times. [27]
R15: Sc in each st around. [27]
R16: (Sc in next 7 sts, dec) 3 times. [24]
R17: Sc in each st around. [24]
R18: (Sc in next 6 sts, dec) 3 times. [21]
R19: Sc in each st around. [21]
R20: (Sc in next 5 sts, dec) 3 times. [18]
R21: Sc in each st around. [18]
R22: (Sc in next 4 sts, dec) 3 times. [15]
R23: Sc in each st around. [15]
R24: (Sc in next 3 sts, dec) 3 times. [12]
R25: Sc in each st around. [12]
R26: Change to skin tone. Inc in each st around. [24]
R27: (Sc in next 3 sts, inc) 6 times. [30]
R28: (Sc in next 4 sts, inc) 6 times. [36]
R29-35: Sc in each st around. [36]
R36: (Sc in next 4 sts, dec) 6 times. [30]
R37: (Sc in next 3 sts, dec) 6 times. [24]
R38: (Sc in next 2 sts, dec) 6 times. [18]
R39: (Sc, dec) 6 times. [12]
R40: Dec 6 times. [6]
After R19, begin stuffing the lower gown in small tufts. For an adult display figure, you may place a washable plastic-canvas circle inside the base before continuing; round every edge and enclose it fully. Do not add a loose hard insert to a child’s toy. Continue stuffing through the neck. After R35, embroider the face while the opening is still large enough to hide knots. Finish stuffing the head before R39. FO after R40, thread the tail through the front loops of the remaining six stitches and pull closed.
Decorative Gown Hem
Hold the angel upside down with the base facing you. Join white yarn in any unused front loop from R7. Ch 2 and work 3 dc in the same loop, skip the next 2 front loops, then sl st in the following loop. Repeat the fan sequence around. Adjust the final repeat if necessary so the trim lies flat. FO and hide the tails inside the gown. If your fans flare too much, replace each 3-dc fan with 2 dc.
Face Embroidery
Use pins to mark two closed eyes between R31 and R32, approximately six to seven stitches apart. With black embroidery floss, make a relaxed horizontal stitch for each eyelid and add one tiny diagonal lash at the outer corner. Embroider the nose between R29 and R30 with two or three short skin-tone stitches. Optional pink stitches placed one round below the eyes create subtle cheeks. Do not pull the thread tightly enough to dent the face.
Textured Hair Cap
R1: With chestnut brown, work 6 sc in a MR. [6]
R2: Working BLO, inc in each st around. [12]
R3: Working BLO, (sc, inc) 6 times. [18]
R4: Working BLO, (sc in next 2 sts, inc) 6 times. [24]
R5: Working BLO, (sc in next 3 sts, inc) 6 times. [30]
R6: Working BLO, (sc in next 4 sts, inc) 6 times. [36]
R7-12: Working BLO, sc in each st around. [36]
Check the cap on the head before adding curls. It should frame the face and reach the lower back of the head without covering the eyes. To create the texture, begin at the lower edge and work through the unused front loops: ch 3, sl st in the next front loop, and repeat in a continuous spiral toward the crown. For tighter curls use ch 2; for fuller curls use ch 4. FO, leave a long sewing tail and pin the cap evenly around the face.
Arms – Make Two
R1: With skin tone, work 5 sc in a MR. [5]
R2-3: Sc in each st around. [5]
R4: Change to white. Sc in each st around. [5]
R5-13: Sc in each st around. [5]
Do not stuff, or add only a whisper of stuffing to the hand. Flatten the final round and sc through both layers twice to close. FO with a long sewing tail. Position the arms so the hands meet over the center of the gown and can hold the star without pulling the shoulders forward.
Wings – Make Two
Row 1: Ch 7. Starting in second ch from hook, sc in next 6 ch. [6]
Row 2: Ch 1, turn; sc in next 6 sts. [6]
Row 3: Ch 1, turn; working BLO, sc in next 6 sts; ch 3, turn; sc in the 2 new ch and across the 6 sts. [8]
Row 4: Ch 1, turn; working BLO, sc in next 8 sts; ch 3, turn; sc in the 2 new ch and across the 8 sts. [10]
Row 5: Ch 1, turn; working BLO, sc in next 10 sts; ch 3, turn; sc in the 2 new ch and across the 10 sts. [12]
Row 6: Ch 1, turn; working BLO, sc in next 12 sts; ch 3, turn; sc in the 2 new ch and across the 12 sts. [14]
Row 7: Ch 1, turn; working BLO, sc in next 14 sts; ch 3, turn; sc in the 2 new ch and across the 14 sts. [16]
After Row 7, work sc evenly around the long side edge and across the foundation-chain edge to neaten the wing. FO with a long tail. Lightly steam-block cotton wings from a safe distance or damp-block them flat. Never press an iron directly onto acrylic yarn. Flip one wing so the ridges mirror each other before assembly.
Golden Star – Make Two Panels
R1: With golden yellow, work 5 sc in a MR. [5]
R2: Inc in each st around. [10]
R3: (Sc, inc) 5 times. [15]
R4: (Sc in next 2 sts, inc) 5 times. [20]
Each star point uses four stitches from R4. Work the following point sequence five times around the 20-stitch core:
Point Row 1: Sc in next 4 sts, ch 1, turn. [4]
Point Row 2: Dec, sc in next st, ch 1, turn. [2]
Point Row 3: Dec, ch 1, turn. [1]
Point Row 4: Sc in the remaining st. FO the point and rejoin yarn in the next unused stitch of the core.
When all five points are complete, FO and weave in short tails. Make a second identical star. Hold the panels wrong sides together and whipstitch around the edges. Add a very small amount of stuffing before closing; too much stuffing will round off the points. Sew the finished star between the hands or attach it with several removable stitches if you want interchangeable accessories.
Halo: Wire-Free Gift Option
For the safest halo, hold gold thread together with yellow cotton and ch 28-34, depending on head size. Join with a sl st to form a ring, taking care not to twist. Work one round of sl sts around the chain, FO and leave two long tails. Attach the ring at two points on the back of the hair cap so it floats just above the head. Add a third small anchoring stitch at the center back if the halo tilts.
Halo: Adult Display Option
For adult decor only, shape a short piece of flexible craft wire into a smooth ring and turn both cut ends inward. Cover the entire wire with tight sc in metallic yarn, then wrap and secure the join. Sew it firmly to the back of the hair cap. No sharp end should be exposed. Never use this version for a baby, toddler, pet toy or unsupervised play.
Assembly Order for a Balanced Angel
- Finish stuffing and close the top of the head.
- Complete the decorative hem and confirm that the angel stands evenly.
- Pin the hair cap around the face. Sew along the hairline and lower back edge, then add two hidden anchor stitches at the crown.
- Pin the wings to the upper back with their inner edges nearly touching. Check the front view before sewing.
- Sew each wing along the inner vertical edge and add a second short attachment line across the top third.
- Position the arms at the sides with the hands meeting at the center. Sew the shoulders firmly.
- Place the star between the hands and secure it through both hands and the upper gown.
- Add the wire-free or adult-display halo and test it from the front, side and back.
- Hide every yarn tail, remove all pins and perform the safety checklist.
How to Make the Angel Stand Straight
A stable angel begins with an even R7 base and centered stuffing. Set the unfinished body on a flat surface after every few decrease rounds. If it leans, move stuffing away from the heavy side rather than forcing the base into shape. The head should be centered over the narrow 12-stitch neck. Place the star only after the wings are attached; this lets you balance the weight at the front and back.
For adult shelf decor, a fully enclosed plastic-canvas circle can improve stability. Cut it slightly smaller than the base, round every edge and insert it after R19. For a washable child-safe keepsake, omit the insert and use dense, evenly distributed stuffing instead.
Christmas Gift and Ornament Variations
- Tree ornament: Use fingering yarn and a smaller hook; add a secure hanging loop through the crown rather than the halo.
- Memorial angel: Add a tiny embroidered initial or date beneath one wing.
- Hostess gift: Present the angel in a clear-top kraft box with a handwritten care card.
- Baptism or first Christmas: Use ivory, champagne and pale gold, and embroider the year on the back.
- Family set: Vary hair shades, skin tones, gown colors and star colors while keeping the same construction.
- Gift topper: Crochet in lighter yarn and tie the figure to reusable ribbon with a removable loop.
- Craft-market collection: Offer classic white, winter blue and warm cream versions as a coordinated trio.
Batch-Making Tips for Christmas Gifts
Make one complete sample before starting a batch and record the exact yarn, hook, finished height and halo chain length. Then work assembly-line style: crochet all gown-and-head pieces, make all hair caps, complete pairs of wings, make star panels, and finish the embroidery last. Keep each angel’s parts together in a labeled project bag.
Use a stitch-count checklist for R10 through R25 because the gradual three-stitch decreases create the gown shape. Weigh or pre-portion stuffing for consistent size. Block all wings together on a gridded mat so every pair has the same span. Before packaging, photograph each angel from the front, side and back; asymmetry is easier to notice in a photo than while holding the toy.
Troubleshooting
The Head Is Too Large or Too Small for the Gown
Confirm that R27 and R28 are increase rounds and that both contain six repeats. The head should reach 36 stitches, matching the widest part of the gown. If the yarn changed between sections, compare thickness and restart the head with a closer match.
The Neck Feels Floppy
Push a firm, narrow tuft of stuffing through the 12-stitch neck before filling the head. Add small pieces gradually and rotate the figure as you work. Do not insert wire or a stick into a child’s toy.
The Hem Fans Ruffle Too Much
The front loops from R7 may be tight or your double crochet tension may be loose. Work 2 dc instead of 3 dc in each fan, or skip three loops instead of two. Block the hem flat when finished.
The Hair Cap Covers the Eyes
Test the plain cap before working the curls. If it is too deep, stop after R10 or R11. Pin the front edge first, then stretch the back edge into position. Add shorter ch-2 curls around the face and longer ch-3 curls at the back.
The Wings Do Not Match
Count the stitches at the end of every row and mark the side where new chains are added. Both wings use the same pattern, but one must be flipped during assembly. Block them together with the inner edges aligned.
The Star Points Look Rounded
Use a firm hook size, keep the decreases snug and add only a pinch of stuffing. Shape each point with the yarn needle before the final seam closes. Cotton holds sharper points than fuzzy acrylic.
The Halo Tilts Forward
Attach it at two points behind the hair cap instead of one point at the crown. Add a third hidden stitch at the center back. A wire-free chain ring should be light enough to remain upright without stiffening.
The Angel Leans After Assembly
The wings or star may be pulling the body off center. Reposition the star closer to the torso and anchor the wings symmetrically. Massage the stuffing down toward the base and confirm that the decorative hem is not folded under one side.
Safety and Care Guidance
For children under three, use embroidered facial details, omit wire, beads, a hanging loop and removable inserts, and secure every separate piece with multiple passes of strong yarn. The star, wings and hair must withstand gentle pulling. Keep all knots inside the figure and remove every pin. A decorative handmade pattern does not replace formal toy-safety testing when products are sold.
Spot clean with cool water and mild soap. Press moisture out in a towel without twisting, reshape the wings and halo, and air-dry completely. If the angel uses an adult-display wire halo or internal base insert, do not machine wash it. Store flat in acid-free tissue so the wings are not crushed.
Packaging the Angel as a Premium Handmade Gift
Choose a box tall enough that the halo does not bend and wide enough that the wing tips do not touch the sides. Anchor the figure with a paper band around the base rather than plastic ties through the crochet. Add a card listing fiber content, care instructions, decorative-versus-toy use, and the year it was made. For a memorial or first-Christmas gift, include a short handwritten note explaining the personalization.
More HooksyLane Crochet Gift Ideas
Explore more amigurumi crochet patterns, browse free crochet patterns, and improve your finishing with the HooksyLane crochet guides. Follow HooksyLane on Pinterest for seasonal crochet gift ideas and visit the HooksyLane Gumroad store for printable pattern resources.
Final Quality Checklist
- The gown reaches 36 stitches before the shaping decreases.
- The corrected head rounds increase 24 to 30 to 36 stitches.
- The neck is firmly supported and the face remains softly rounded.
- The closed eyes are level and the nose is centered.
- The hair cap frames the face without covering the embroidery.
- The wings are mirrored, evenly blocked and securely attached.
- The star has five defined points and only light stuffing.
- The halo is centered and appropriate for the recipient.
- All tails are hidden, every pin is removed and gift packaging includes care information.
This crochet angel pattern combines a meaningful Christmas theme with satisfying crochet techniques and many personalization options. Count the corrected head increases carefully, support the neck with small tufts of stuffing, mirror the wings before sewing and choose the halo construction for the recipient. The result is a polished handmade angel that can become a treasured ornament, memorial keepsake or Christmas gift.