
Crochet Santa Pattern: A Handmade Christmas Gift
Table of Contents
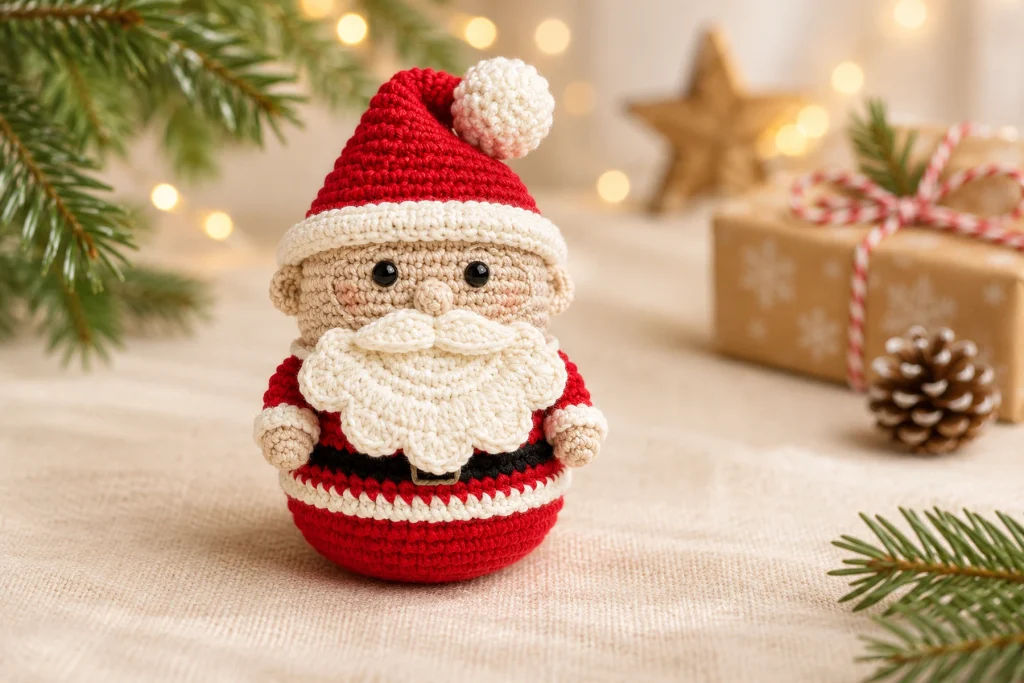
This crochet Santa pattern creates a compact roly-poly Christmas amigurumi that works beautifully as a handmade gift, stocking stuffer, office decoration or festive keepsake. The finished Santa has an oval beige face, classic red suit, black belt band, layered white trim, tiny arms, a scalloped beard, shaped mustache and a long folded hat with an integrated pom-pom. The complete tutorial below uses US crochet terms and adds practical help with foundation ovals, loop-only rounds, face placement, assembly, gifting, care and toy safety.
Crochet Santa Pattern at a Glance
- Skill level: Confident beginner to intermediate.
- Construction: Oval head-and-suit shell, separate stuffed base, two arms, beard, mustache, ears, muzzle and removable-looking hat.
- Main techniques: Working around a foundation chain, spiral rounds, increases, decreases, BLO, FLO, double crochet shells and seaming.
- Suggested hook: US C/2 / 2.5 mm, or a hook that creates a firm fabric.
- Estimated time: About 5-8 hours including careful assembly.
- Best uses: Secret Santa gift, stocking stuffer, teacher gift, shelf decor or craft-market product.
Why This Santa Is a Smart Crochet Gift Idea
Small amigurumi gifts are personal without requiring the time or sizing decisions of a wearable. This Santa can be displayed every December, fits inside a gift box, and is easy to personalize through skin tone, suit color, beard texture or an embroidered year. Because the main form has a wide rounded base, it also photographs well for Pinterest and product listings.
Match the finishing to the recipient. Use embroidered eyes and permanently sewn accessories for a young child. Keep the hat removable for an adult collector. Add a name tag for a teacher or coworker, or make a matching pair for grandparents. A small kraft box, tissue paper and a handwritten care card are enough to turn the finished toy into a polished handmade present.
Materials for the Crochet Santa Amigurumi

- Sport or 4-ply cotton yarn in red, white, beige and black.
- A small amount of silver-gray yarn for an optional decorative accent.
- US C/2 / 2.5 mm crochet hook.
- Two 6 mm safety eyes, or black embroidery thread.
- Polyester toy stuffing.
- Stitch marker, yarn needle, pins, scissors and stuffing tool.
- Optional 1.5-2 mm aluminum wire for a display-only poseable version.

Important Material Choice
Wire and glue are unnecessary for a soft gift toy. For the safest and most durable result, sew every piece with yarn and leave the arms unstuffed. If you use wire for an adult display figure, bend every end into a closed loop, cover it completely and label the doll as decoration rather than a children’s toy.
US Crochet Abbreviations
| Abbreviation | US meaning |
|---|---|
| MR | magic ring |
| ch | chain |
| sl st | slip stitch |
| sc | single crochet |
| hdc | half double crochet |
| dc | double crochet |
| inc | 2 sc in the same stitch |
| dec | single crochet 2 stitches together; invisible decrease recommended |
| BLO | back loop only |
| FLO | front loop only |
| st(s) | stitch(es) |
| R | round or row |
| FO | fasten off |
Before You Begin
- Work continuous rounds unless the pattern specifically asks you to join.
- Move the stitch marker after every round and recount shaped rounds.
- The head and base begin around both sides of a foundation chain, forming an oval.
- Keep the unused loops from BLO and FLO rounds visible; they become attachment points or decorative ridges.
- Use small tufts of stuffing so the rounded base stays smooth.
- Leave long sewing tails on the base, arms, beard, ears and muzzle.
Complete Crochet Santa Pattern
Head and Suit Shell
Foundation: With beige, ch 13. Beginning in the second ch from the hook, work around both sides of the foundation chain.
R1: Sc in next 11 ch, 3 sc in last ch, sc in next 10 ch along the opposite side, inc in the final ch. [26]
R2: Inc, sc in next 10 sts, inc in next 3 sts, sc in next 10 sts, inc in next 2 sts. [32]
R3: Sc, inc, sc in next 10 sts, (sc, inc) 3 times, sc in next 10 sts, (sc, inc) twice. [38]
R4: Sc in next 2 sts, inc, sc in next 10 sts, (sc in next 2 sts, inc) 3 times, sc in next 10 sts, (sc in next 2 sts, inc) twice. [44]
R5-14: Sc in each st around. [44]
R15: Change to white. Sc in BLO around. [44]
Eye placement: Insert 6 mm safety eyes between R8 and R9 with about five visible stitches between them. Pin the ears, muzzle and mustache before locking the backs so the expression remains centered. Use embroidered eyes for a recipient under age three.
R16-20: Change to red. Sc in each st around. [44]
R21-22: Change to black. Sc in each st around. [44]
R23: Change to red. Working in FLO: sc in next 3 sts, inc, sc in next 10 sts, (sc in next 3 sts, inc) 3 times, sc in next 10 sts, (sc in next 3 sts, inc) twice. [50]
R24: Change to white. Sc in each st around. [50]
Do not close this shell. The separate red base will be sewn inside the unused back loops of the black belt section after stuffing.
White Face Trim
Hold the head upside down with the face toward you. Join white yarn in the visible front loops from R14 and work 1 sc in each visible loop around. [44] Join with a sl st, FO and hide the ends. This ridge frames the lower face and separates it from the red suit.
Separate Red Base
Foundation: With red, ch 13. Beginning in the second ch from the hook, work around both sides of the chain.
R1: Sc in next 11 ch, 3 sc in last ch, sc in next 10 ch along the opposite side, inc in the final ch. [26]
R2: Inc, sc in next 10 sts, inc in next 3 sts, sc in next 10 sts, inc in next 2 sts. [32]
R3: Sc, inc, sc in next 10 sts, (sc, inc) 3 times, sc in next 10 sts, (sc, inc) twice. [38]
R4: Sc in next 2 sts, inc, sc in next 10 sts, (sc in next 2 sts, inc) 3 times, sc in next 10 sts, (sc in next 2 sts, inc) twice. [44]
R5-8: Sc in each st around. [44]
FO with a long sewing tail. Stuff the Santa through the lower opening, placing firmer stuffing along the bottom and lighter stuffing behind the face. Pin the 44-stitch base evenly inside the unused back loops of head-and-suit R22, then sew one stitch to one loop around. Check that Santa sits upright before closing the final gap.
Arms – Make Two
R1: With beige, work 8 sc in a MR. [8]
R2-3: Sc in each st around. [8]
R4: Change to white. Sc in each st around. [8]
R5: Change to red. Sc in BLO around. [8]
R6-7: Sc in each st around. [8]
R8: (Sc in next 2 sts, dec) twice. [6]
Do not stuff. Join white yarn in the unused front loops of R4 and work 1 sc in each loop around to form the cuff. [8] FO with a long tail. Flatten the top and sew the arms symmetrically to the red suit.
Scalloped Beard
R1: With white, work 6 sc in a MR. [6]
R2: Inc in each st around. [12]
R3: (Sc, inc) 6 times. [18]
R4: (Sc in next 2 sts, inc) 6 times. [24]
R5: (Sc in next 3 sts, inc) 6 times. [30]
R6: (Sc in next 4 sts, inc) 6 times. [36]
Fold the circle in half with wrong sides together. Working through both layers, sc in next 2 sts, then repeat (5 dc in the next st, sc in next 2 sts) five times across the curved edge. FO with a long tail. Pin the straight folded edge below the muzzle and sew it securely to the face without flattening the scallops.
Mustache
With white, ch 12. Beginning in the second ch from the hook, work: sl st in next 2 ch, sc, hdc, dc, sl st, dc, hdc, sc, sl st in final 2 ch. Ch 1, FO and hide the starting tail. Pin the center dip directly beneath the muzzle and sew the mustache at the center and both outer tips.
Santa Hat and Integrated Pom-Pom
Foundation: With red, ch 48. Join with a sc in the first ch, taking care not to twist.
R1: Sc in each st around. [48]
R2: Working in BLO: dec, sc in next 18 sts, dec twice, sc in next 22 sts, dec. [44]
R3: (Sc in next 20 sts, dec) twice. [42]
R4: (Sc in next 19 sts, dec) twice. [40]
R5: (Sc in next 18 sts, dec) twice. [38]
R6: (Sc in next 17 sts, dec) twice. [36]
R7: (Sc in next 10 sts, dec) 3 times. [33]
R8: (Sc in next 9 sts, dec) 3 times. [30]
R9: (Sc in next 4 sts, dec, sc in next 4 sts) 3 times. [27]
R10: (Sc in next 7 sts, dec) 3 times. [24]
R11: (Sc in next 3 sts, dec, sc in next 3 sts) 3 times. [21]
R12: (Sc in next 5 sts, dec) 3 times. [18]
R13: (Sc in next 4 sts, dec) 3 times. [15]
R14: (Sc in next 3 sts, dec) 3 times. [12]
R15: Sc in each st around. [12]
R16: (Sc in next 2 sts, dec) 3 times. [9]
R17: (Sc, dec) 3 times. [6]
R18: Sc in each st around. [6]
R19: Change to white. Inc in each st around. [12]
R20: (Sc, inc) 6 times. [18]
R21: (Sc in next 2 sts, inc) 6 times. [24]
R22-23: Sc in each st around. [24]
R24: (Sc in next 2 sts, dec) 6 times. [18]
R25: (Sc, dec) 6 times. [12]
R26: Dec 6 times. [6]
Stuff the white pom-pom lightly before closing. FO, thread the tail through the final six stitches and pull closed. Fold the upper hat to one side and secure it with several hidden red stitches.

Folded White Hat Brim
- Join white yarn inside the original 48-chain hat edge.
- Work two rounds of 48 sc. [48]
- Fold the white edge outward.
- Using the visible front loops from red R1, sl st through both the folded white edge and each corresponding red loop around. [48]
- FO and hide the ends inside the hat.
Ears – Make Two
R1: With beige, work 5 sc in a MR. Ch 1 and turn. [5]
R2: Sc in each st across. [5]
FO with a long tail. Pin the ears level with the eyes and sew only the straight edge so each ear remains slightly cupped.
Round Muzzle
R1: With beige, work 5 sc in a MR. [5]
R2: Sc in each st around. [5]
FO with a long tail. Do not stuff. Shape the piece into a tiny rounded nose and sew it between and slightly below the eyes. The mustache center should sit directly beneath it.
Best Assembly Order
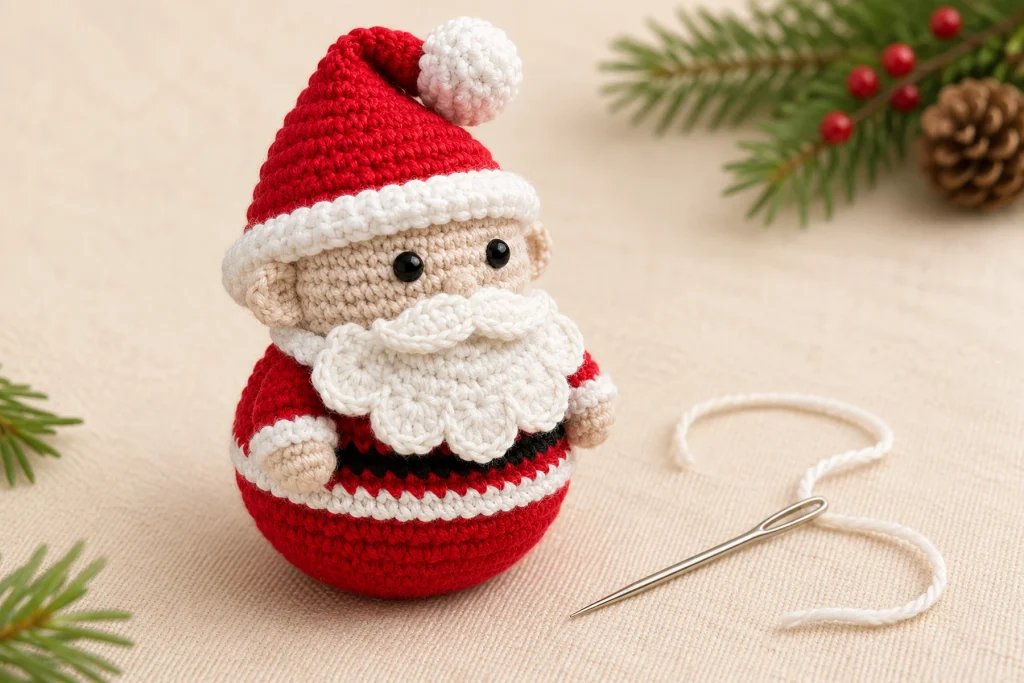
- Install or embroider the eyes between head rounds 8 and 9.
- Add the white face trim in the visible loops of R14.
- Stuff the main shell and sew the red base inside the belt section.
- Pin both ears at equal height.
- Center the beige muzzle below the eyes.
- Place the mustache below the muzzle and the beard behind it.
- Sew the beard first, then the muzzle and mustache so the layers overlap naturally.
- Add the white cuffs and sew both arms to the suit.
- Finish the pom-pom and folded brim, then place the hat over the face.
- For a child’s toy, secure the hat at four or more hidden points.
How to Make the Gift Look Professional
- Steam lightly, never press: Hold a steamer above the beard for a few seconds and shape the scallops with your fingers.
- Use invisible anchors: Add one hidden stitch under each mustache tip and arm to stop rotation.
- Balance the base: Set Santa on a flat surface before closing and redistribute stuffing until he stands straight.
- Add a care card: State the fiber, cleaning method and whether safety eyes or wire were used.
- Wrap without crushing: Use a box slightly taller than the hat and support the beard with tissue paper.
Crochet Gift Presentation Ideas
- Place Santa in a kraft window box with red tissue and cotton twine.
- Add a miniature handwritten tag reading “Made for you.”
- Pair Santa with a mug, cocoa sachet and candy cane for a coworker gift.
- Include an embroidered year on the back for a family keepsake.
- Create a teacher-gift set with Santa and a handmade bookmark.
- Use the finished doll as a reusable gift-box topper.
- Make two color variations for a matching grandparent set.
- Offer a finished Santa together with the printable pattern for a crocheter.
Troubleshooting
The Foundation Oval Has Holes
Crochet into the back bumps of the chain and keep the turning-end stitches snug. Use the starting tail to close any tiny gap before weaving it in.
The Base Does Not Match the 44-Stitch Opening
Recount R4 of the base and R22 of the main shell. Pin the front, back and two sides first, then distribute the remaining stitches evenly. Do not stretch only one section.
The Beard Curls or Covers the Belt
Block the semicircle lightly before sewing. Attach the straight folded edge higher on the face, then anchor only the upper edges of the scallops so they remain dimensional.
The Mustache Looks Uneven
Find the central slip stitch and pin it beneath the muzzle first. Mirror the two sides before sewing the tips. A single hidden stitch through each dc section keeps the curves balanced.
The Hat Brim Is Too Tight
Relax your slip stitches when joining the folded brim. If necessary, use a hook 0.5 mm larger only for the joining round. Test the hat before weaving in the final end.
Santa Falls Forward
Move some stuffing from the front into the lower back and flatten the base gently on a table. Avoid overstuffing the beard or face area.
Safety and Care
Plastic safety eyes, wire, glue and removable accessories are not suitable for children under three. For a young child’s gift, embroider the eyes, omit all wire, sew every part with yarn and attach the hat permanently. Check the beard, mustache, ears, arms and base seam before gifting. Spot clean with cool water and mild soap, reshape and air-dry completely. Follow the yarn label if gentle machine washing is appropriate.
Customization Ideas
- Use warm brown, tan or deep beige for different skin tones.
- Replace red with forest green, burgundy or icy blue.
- Embroider tiny stars on the suit with metallic thread.
- Add rosy cheeks with a small amount of fabric-safe blush.
- Use velvet yarn and a larger hook for a soft shelf-size Santa.
- Add a hanging loop only if you intentionally make a lighter ornament version.
More HooksyLane Crochet Gift Ideas
Explore more amigurumi crochet patterns, browse free crochet patterns, and improve your finishing with the HooksyLane crochet guides. Follow HooksyLane on Pinterest for Christmas crochet gift inspiration and visit the HooksyLane Gumroad store for printable patterns.

Final Quality Checklist
- The oval foundation lies flat without gaps.
- The eyes are level and approximately five stitches apart.
- The muzzle, mustache and beard are centered in layers.
- The face trim and belt lines are even.
- The base sits flat and the Santa stands upright.
- The arms and ears are symmetrical.
- The hat brim stretches comfortably around the head.
- Every accessory is appropriate for the recipient.
- All yarn tails are hidden and every pin is removed.
This crochet Santa pattern becomes much more than a seasonal decoration when it is finished for a specific recipient. Choose their favorite colors, keep the base balanced, pin the layered face before sewing and package the doll with a simple care card. Those details turn a small Christmas amigurumi into a thoughtful handmade crochet gift that can return to the holiday display year after year.