Easy Crocheting Tips and Patterns for Creative Beginners
Table of Contents
You hold a hook and yarn for the first time, and crocheting seems to have a language of its own. Your first loops may look uneven, and a missed stitch can make a row bend. Those early mistakes are a normal part of learning.
This guide helps you turn basic movements into a small handmade project, one step at a time. You will begin with a few materials, then build control through practice. Give yourself time to repeat a movement before expecting it to feel comfortable.
You do not need perfect stitches to make progress. A beginner who spots a mistake and tries again is already learning how the loops work together. HooksyLane also welcomes new learners with an approachable introduction to crochet.
Start with basic materials and a small goal, rather than a large project. First, it helps to know what crochet is and how it differs from knitting.
What Is Crocheting?
Crochet makes fabric by drawing yarn loops through other loops with one hooked needle. You can learn crochet through a few basic movements, then use them to make a wide range of projects.
Each crochet project grows from connected stitches. Written patterns tell you how to repeat those stitches and shape the fabric. The craft can make flat pieces, such as scarves, or shaped pieces, such as hats and toys.
How Is Crocheting Different From Knitting?
Crocheting uses one hook to pull a loop through another, while knitting typically uses two needles. In knitting, several live loops often stay on the needles as you work. Crochet usually keeps one active loop on the hook.
That difference can make basic crochet feel simpler to start, but it does not make one craft right for everyone. Some people like the way a hook lets them work one stitch at a time. Others prefer knitting’s rhythm and fabric.
For a brief crocheting vs knitting comparison, think about the tool and movement you would rather practice. Both crafts can make useful, creative things. Your comfort matters more than choosing the “better” craft.
How Do You Pronounce Crocheting?
“Crochet” is pronounced “kroh-SHAY,” and “crocheting” is pronounced “kroh-SHAY-ing.” Crochet names the craft, while crocheting describes doing it.
You may hear both words in patterns, classes, and conversation. Once you know the sound, you can focus on the loops instead of wondering how to say the name.
A basic crochet start takes only a few supplies. A smooth yarn, a well-matched hook, and simple finishing tools are enough to begin.
What Belongs in a Crocheting Kit?
Begin with one suitable hook and an easy-to-see yarn. A small crocheting kit does not need many tools, and you can add extras after you know what helps you work.
The best first supplies let you see each loop clearly. That makes it easier to count stitches and notice where the hook should go.
Choose Yarn That Makes Stitches Easy to See
Smooth, light-colored, medium-weight yarn is a practical choice for early practice. The strands show your stitches clearly, so you can see the loops and find the right place for your hook.
Dark, fluffy, or heavily textured yarn can hide those details. It may look appealing, but it can make the first rows harder to read. Save it for a time when you can spot each stitch by touch or sight.
Yarn labels usually list the yarn’s weight and recommend a hook size. Keep the label with your yarn, since it can help you match supplies later.
Match the Hook to the Yarn
A crochet hook pulls yarn through loops to form each stitch. Start with the hook size recommended on the yarn label, then adjust only if the yarn or your work feels hard to manage.
Hooks come in metal, plastic, bamboo, and wood. Each material feels different in your hand, so the best choice depends on what feels comfortable and gives you good control.
The hook’s size affects the space inside your loops. A hook that is too small for the yarn can make the fabric tight. A larger hook tends to make looser stitches.
Which Finishing Tools Are Useful?
Scissors and a yarn needle are useful essentials for finishing a piece. Use the scissors to cut yarn, then use the needle to weave loose ends into the fabric.
Stitch markers and a flexible measuring tape are helpful extras, not requirements for your first practice piece. A marker can show where a row starts, while a tape can help you check the piece’s size.
Keep the setup simple so you can focus on learning. Once your yarn and hook are ready, set your hands in a relaxed position and guide the working yarn without a fight.
How Should You Hold the Hook and Yarn?
There is no single required way to hold hook and yarn. Choose a grip that feels controlled and comfortable, then let your hands move without squeezing.
Your dominant hand is your hook hand. The other hand guides the working yarn and helps steady the fabric as you work.
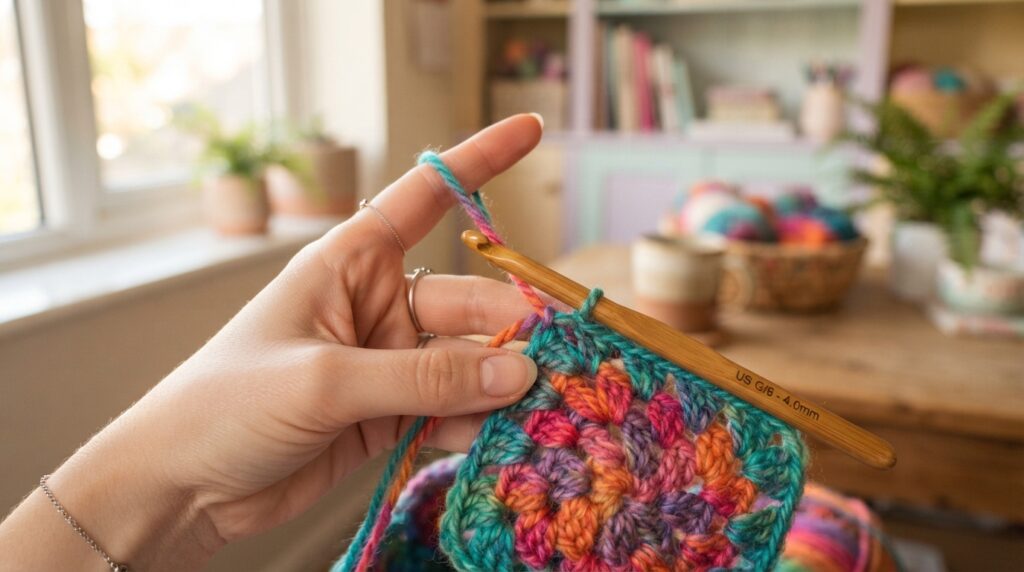
Try the Pencil Grip or the Knife Grip
In the pencil grip, the hook rests in your hand much like a pencil. Your fingers hold it near the thumb and index finger, while the hook points toward the work.
In the knife grip, your hand rests over the hook, much like it would over a table knife. Your thumb and fingers guide the tool from above.
Try each position for a few moments. Keep the grip that lets the hook turn and catch yarn without forcing your wrist into an awkward angle.
Guide the Working Yarn With Your Other Hand
Let your non-hook hand guide the working yarn toward the hook. You might pass it over one finger to create gentle resistance, then use another finger to steady the fabric.
Your yarn hand controls how much yarn feeds into each loop. You do not need to copy another person’s exact finger placement. Aim for a steady feed that lets the hook move freely.
If the yarn slips too quickly, adjust your fingers to add a little resistance. If it drags, loosen your hold so the hook can draw through the loop.
Adjust Tension Without Squeezing
Tension means how consistently you control the yarn feed and the size of your loops as you make stitches. Too much squeezing can make stitches smaller and harder to enter. Too little resistance can leave the loops slack.
Try to keep your wrists relaxed as you work. A loose, steady hold gives the hook room to move and helps your stitches stay more even.
If your hand aches, stop and take a break. You can return when your fingers feel rested. Once the grip feels comfortable, you are ready to make the first adjustable loop.
How Do You Start Crocheting as a Beginner?
Begin by forming a loose slip knot on the hook. The adjustable starting loop gives you a place to begin a foundation chain, the linked starting row for many projects.
Keep the first few movements slow. You are learning to move the hook and yarn together, not racing to make a long chain.
How to Crochet for Beginners Step by Step With Pictures
Follow these movements to make a slip knot and chain. The pictures should show your hand position and each loop movement, so you can compare the hook’s path with your own.
- Make a loose loop with the yarn, leaving a short tail. Pull a section of the working yarn through the loop to form the slip knot.
- Place the slip knot on the hook. Pull the working yarn gently until the loop rests around the hook without gripping it tightly.
- Bring the working yarn over the hook from back to front. This movement is called a yarn over.
- Use the hook to pull the yarn-over through the loop already on the hook. You have made one chain stitch.
- Repeat the yarn over and pull-through movement to make more chain stitches. Keep the chain loose enough for your hook to enter later.
Do not pull the chain tight after each stitch. A tight chain can be difficult to work into when you start the first row.
A crocheting video can help if the hook’s movement is hard to picture. Pause and replay the same moment as often as needed, then try the motion again.
How Do You Count Chain Stitches?
Look for the small V shapes along the foundation chain. Each V is one chain stitch, and the loop sitting on the hook is not part of the count.
Do not count the slip knot as a chain stitch. If you need 11 chain stitches, count 11 V shapes below the hook, not the slip knot or the active loop.
For a first row, insert the hook into the chain specified by the pattern. A common practice row starts in the second chain from the hook, leaving the loop on the hook out of the count.
That first row can feel awkward because the chain may twist or the hook may catch only one strand. A loose chain or a short practice chain makes insertion easier to learn.
Once the chain is ready, you can work fabric-forming stitches into it and begin to see a row take shape.
Which Basic Crochet Stitches Should You Learn First?
Single crochet is a straightforward first stitch for practicing hook placement and counting. After you can make it across a row, try double crochet and half double crochet for different stitch heights.
These three crochet stitches use the same hook and yarn, but each one moves through loops in a different way. The steps below use US stitch names.
Make a Single Crochet Stitch
Insert the hook into the stitch where you want to work. Yarn over and pull up a loop, so two loops rest on the hook.
Yarn over again, then pull through both loops. That completes one single crochet stitch. Repeat the movement in each stitch across the row.
Single crochet makes a compact fabric that can show you where your stitches begin and end. Count each finished stitch as you work, especially near the row’s edges.
Try Double Crochet
Double crochet makes a taller stitch than single crochet. Start with a yarn over, then insert the hook into the stitch and pull up a loop.
You now have three loops on the hook. Yarn over and pull through two loops, then yarn over again and pull through the last two loops.
The two pull-throughs give this crochet stitch its height. You may see more space between double crochet stitches than between single crochet stitches.
Add Half Double Crochet
For half double crochet, yarn over first, insert the hook, and pull up a loop. You will have three loops on the hook.
Yarn over once more and pull through all three loops. This stitch is taller than single crochet and shorter than double crochet.
Stitch names change across pattern regions. In US terms, single crochet (sc) is double crochet (dc) in UK terms. US double crochet (dc) is UK treble crochet (tr), and US half double crochet (hdc) is UK half treble crochet (htr).
Count completed stitches at the end of each row to keep its width steady. You can also find more crochet-related reading on the Hooksylane Gumroad page. Patterns name and organize the movements you have practiced.
How Do You Read a Beginner Crochet Pattern?
A short instruction such as “ch” saves space by standing for “chain.” Crochet patterns use abbreviations to name stitches and tell you where and how often to work them.
Before starting, check whether the pattern uses US or UK terms. The same stitch name can mean a different movement in each system, so that detail affects every row.

Learn Common Pattern Abbreviations
Patterns often use a small set of shortened terms. Read the pattern key first, since a designer may explain special terms or use a less common abbreviation.
- ch means chain.
- sc means single crochet; hdc means half double crochet.
- dc means double crochet; sl st means slip stitch.
- st or sts means stitch or stitches; rep means repeat.
- rnd means round; yo means yarn over.
The US and UK naming difference matters most when a pattern calls for double crochet. Check the stated terms before making your first stitch, rather than relying on the name alone.
For more help with abbreviations, punctuation, and chart symbols, use this step-by-step guide to reading crochet patterns. It can help you choose instructions that match your skill level.
Track Stitches, Rows, and Repeats
A pattern may ask you to repeat a group of stitches several times. Follow the repeat marks carefully, since each repeat controls the row’s length or shape.
Count your stitches at the end of every row. If the pattern calls for 10 stitches, check that you have 10 before turning your work.
The first stitch at an edge can be hard to spot after a turning chain. Place a stitch marker in that first stitch if you tend to miss it.
Keep track of your row number with a note or tally mark. If you pause, write down the last row you completed so you can return without guessing.
Once the pattern’s short terms and repeats make sense, choose a small project with clear instructions and a steady stitch count.
What Beginner Crochet Project Should You Try First?
A small flat swatch is a useful first project because stitch-counting mistakes are easy to spot and fix. You can practice turning at each row without committing to a large piece.
Use a simple repeat pattern to learn how the edges behave. If one row changes width, you can find the mistake before the fabric grows much larger.
Practice on a Small Flat Swatch
Make 11 chain stitches. Work 10 single crochet stitches, starting in the second chain from the hook. At the end of the row, chain one and turn.
Work 10 single crochet stitches across the next row. Keep repeating the chain-one turn and 10 stitches across each row until the swatch is square.
Check the edge after each row. If you count nine or eleven stitches instead of ten, look for a missed stitch or an extra stitch near the row’s end.
When you are ready for a different project, try one that repeats familiar movements. A scarf gives you long rows, while a granny square lets you practice in rounds.
- A scarf lets you practice the same row across a longer piece.
- A granny square offers a compact project with changing rounds.
- A simple dishcloth makes a useful flat project with a clear shape.
- A small blanket made from practice squares uses several small pieces.
Choose a project with a clear pattern and a size you can finish in manageable sessions. You can browse more easy crochet projects for beginners for ideas such as coasters and washcloths.
For more project inspiration, visit Hooksylane on Pinterest. Looking at different project shapes can help you decide what you would enjoy making next.
How to Crochet for Kids
A child learning alongside an adult can start with short practice sessions. A few rows at a time are easier to manage than a long project that asks for sustained focus.
Choose easy-to-see yarn so the child can find each stitch. An adult can help set up the yarn and hook, then point out the V-shaped chain stitches.
An adult should handle scissors or help with setup. Keep the project small, and let the child pause when the hand feels tired or the steps become frustrating.
After the swatch is done, the next task is to secure its yarn and tidy the loose ends.
How Do You Finish Your First Crochet Project?
Secure the final loop before trimming and hiding loose ends. Leave a tail of about 6 inches (15 cm), pull it through the last loop, and tighten it gently.
This finishing step fastens off the yarn so the last stitch does not unravel. Keep the pull gentle, since a hard tug can make the edge draw inward.
Thread the tail through a yarn needle. On the back of the work, weave the needle through several stitches, then change direction and pass through a few more.
Do not pull the yarn so tightly that the fabric curls or gathers. Leave enough slack for the stitches to lie flat, then trim the extra tail close to the fabric.
Repeat with any loose end from the starting knot. Hiding the tails on the back keeps the front neater, though the exact finish can vary by project.
Blocking is optional and depends on the project, yarn, and pattern instructions. It can help a piece lie flatter, but you do not need to block every practice swatch.
If the foundation-chain edge puckers, the chain may have been too tight. Try a looser chain next time, or use a larger hook just for the chain.
If your row width changes, you may have missed or added stitches. Count each row and check the first and last stitch, since the last stitch can be easy to overlook.
Keep the finished swatch as a reference for your stitches and tension. A concrete next step is to make another small square and compare its rows with the first one.
Conclusion
Skill grows through repeated, manageable practice, not through perfect first rows. Each time you make a stitch, you learn a little more about how the hook, yarn, and loops work together.
Make one more small swatch and focus on even loops and a steady stitch count. You can spot changes in your work more easily when you keep the project simple.
For your next practice session, make a short foundation chain and turn it into a small square. Let the finished piece show what you can do now, not what you think every stitch should look like.