10 Common Crochet Problems for Beginners and How to Fix Them
Table of Contents
Most beginner crochet problems are easier to diagnose when you stop at the first visible change. A few extra rows can make a small mistake harder to find, so pause and inspect your work before continuing. You can learn what to check first, then choose a fix that suits the problem.
Gauge is the number of stitches and rows you make within a stated measurement, commonly a 4-inch square in US crochet patterns. US and UK crochet stitch names differ, so follow the terms and stitch instructions used by your pattern.
SEO title: 10 Common Crochet Problems for Beginners and How to Fix Them
Meta description: Fix crochet problems for beginners with clear steps to spot uneven edges, loose tension, missed stitches, and more with easy fixes for your next project.
URL slug: /crochet-problems-for-beginners/
Contents: Changing stitch count; uneven edges; tension; tight starting chain; twisted foundation chain; gaps; curling fabric; split yarn; wrong stitch placement; wrong project size.
A first handmade project can feel frustrating when the fabric changes shape or a row looks different from the pattern. You do not need to guess or keep adding rows. Check the stitch count first, then use the contents to jump to the symptom you see.
How Do You Fix Crochet Problems for Beginners Like a Changing Stitch Count?
A changing stitch count usually means you missed a stitch or worked an extra one. Compare the row with the pattern, then inspect both ends before starting another row.
Count the stitches you made and compare that number with the pattern’s row instructions. Check the first and last stitches closely, since they are easy to overlook at the edges.
Missed stitches at the row edge
A missed first or last stitch leaves you with one fewer stitch than the pattern calls for. For example, a row meant to hold 20 stitches may have 19 if you skip its final stitch.
Follow the edge columns to locate the first and last stitches. If the count is short, look for a skipped stitch before adding more rows. Unravel to the missed stitch and work it correctly.
Extra stitches from an added loop
Working into the same stitch twice by mistake can add one stitch. You can also add one by working into the turning chain when the pattern does not count it.
Turning-chain rules depend on the pattern. Count a turning chain as part of the row only when the pattern says to do so. The pattern’s rule takes priority over a general habit.
For a half double crochet row, the pattern may tell you to chain one and work into the first stitch. Follow those instructions rather than assuming the chain counts.
| What you see | Likely cause | Check | Fix |
|---|---|---|---|
| One fewer stitch | Missed first or last stitch | Inspect both row ends | Unravel and work the missed stitch |
| One extra stitch | Same stitch worked twice | Look for two stitches in one top V | Unravel the extra stitch |
| Count changes by row | Turning-chain rule applied inconsistently | Read the row instructions | Use the pattern’s rule each row |
For more help finding row edges and counting stitches, see this half double crochet step-by-step guide. Once the count matches, inspect the shape of both row edges.
Why Are Your Crochet Edges Uneven?
A rectangular piece that slowly widens may have an extra stitch at one or both row ends. Uneven crochet edges often come from inconsistent placement at the first or last stitch.
Follow the edge columns upward to see where the sides begin to slope. A narrowing piece can point to stitches missed at the edges; widening can point to extra stitches.
Follow the first-stitch edge
Mark the first stitch of a row with a removable stitch marker. Work into that stitch when the pattern tells you to, rather than mistaking the turning chain for the first stitch.
Keep the marker in the same place as you turn. If the edge steps inward, compare the marked stitch with the row instructions and check whether you skipped it.
Find the last stitch before turning
Before turning, locate the final stitch in the row by following the top V shapes to the edge. The last stitch can sit close to the turning chain and blend into it.
One common mistake is treating the turning chain as a stitch without checking the pattern. Follow the pattern’s rule each time, and mark the last stitch if you lose track.
- Find the first stitch and mark it if needed.
- Work the row while checking its stitch count against the pattern.
- Identify the last stitch before turning to begin the next row.
For example, if a piece widens after each row, check whether the final stitch has been worked twice. If it narrows, inspect the first and last stitches for skipped loops.
Correct edge placement will not fix fabric that feels unusually stiff or loose. Those clues point to tension, which changes the size and feel of your stitches.
How Do You Fix Crochet Problems for Beginners Caused by Tension?
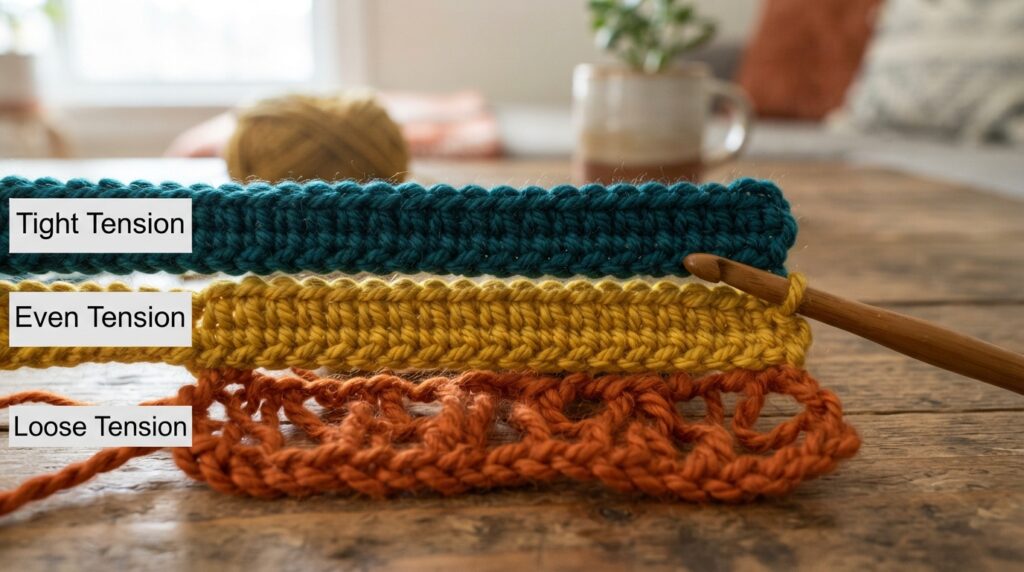
Tension is how you control the size and consistency of your loops. Start by adjusting your hand position and yarn flow before changing hook size.
Rigid fabric, hard-to-work stitches, or loops that vary in height can signal uneven crochet tension. Let the yarn slide through your fingers without gripping or tugging it after every stitch.
Hold the hook in a way that feels steady, and keep your yarn hand relaxed. If a stitch feels hard to enter, pause and loosen your grip instead of forcing the hook through.
| Fabric clue | Likely cause | First adjustment | What to recheck |
|---|---|---|---|
| Rigid fabric | Loops pulled too tight | Relax grip and yarn flow | Whether the hook enters stitches easily |
| Loose uneven loops | Yarn tension changes between stitches | Keep a steady yarn path | Loop height across the row |
| Tension changes during a row | Hand position shifts as you work | Pause and reset your hold | Stitch size at both row ends |
Loosen stitches that feel tight
If your fabric feels rigid, let each loop sit on the widest part of the hook before pulling through. Do not yank the yarn to make every stitch look smaller.
A larger hook generally makes stitches larger, while a smaller hook generally makes them smaller. Choose a hook based on a swatch and the pattern’s gauge, not on a rule that one size suits everyone.
Make loose stitches more consistent
Loose loops that change height often come from shifting hand position or uneven yarn flow. Keep your hook angle steady and guide the yarn at a pace you can repeat.
Pulling the working yarn harder to correct each stitch can make tension less consistent. Instead, pause when the loops change and reset your hand position before continuing.
For an example of how tension and stitch placement affect half double crochet rows, use this half double crochet guide. Even tension starts at the foundation, so check a too-tight starting chain separately.
Why Is Your Starting Chain Too Tight?
If your hook struggles to enter the chain loops, the starting chain may be too tight. Compare its loops with the stitches in your first row before working farther.
A tight chain can pull the first row into a curve or make its loops hard to reach. If the chain loops look much smaller than the stitches above them, remake the foundation.
Try this three-step method:
- Remake the chain with a larger hook.
- Let the yarn move through your fingers without pulling it taut.
- Work the first row and check that it sits flat.
Some crocheters make the chain with a larger hook, then switch back for the first row. That can work if the pattern allows it and you can keep the chain’s loops easy to enter.
Adding more stitches will not correct a tight starting chain. It changes the count but leaves the foundation loops too small, so the first row may still curve or feel cramped.
Do not force the hook through a tiny loop. That can stretch one chain unevenly and make the next loop even harder to enter.
Before joining or working across the chain, lay it flat. A tight chain needs a size adjustment, while a twisted chain needs to be spread out and aligned.
How Can You Untwist a Foundation Chain?
A foundation chain can turn over itself before the first row is complete, leaving a twist trapped in the fabric. Lay the chain flat and check its top loops before working into it or joining a round.
Spread the chain across a table or your lap, then check that the top loops all face the same way. A twisted chain turns back on itself; uneven tension changes loop size without flipping the chain.
Check the chain after making the first few loops, then check again just before joining a long chain into a round. This gives you a chance to straighten it before the first row holds the twist in place.
Rushing to join a long chain is a common cause of a trapped twist. Lay the full chain flat and follow it from end to end before joining its ends.
If the twist is already caught in the first row, undoing back to the chain is often the cleanest correction. Try not to pull only one edge straight, since the first row can keep the twist hidden.
Once the foundation lies flat, move from its shape to the spaces between completed stitches.
Why Are There Gaps Between Your Crochet Stitches?
Some crochet stitches and patterns include gaps on purpose, while isolated holes may signal a missed or misplaced stitch. A gap is not automatically a mistake.
Compare the fabric’s texture with the pattern instructions. Open stitch patterns and chain spaces create spaces in a planned sequence, while an unexpected hole may appear between otherwise solid stitches.
Check whether each gap repeats in the same place across the row or round. A regular pattern of openings is more likely intentional than one lone hole among solid stitches.
If you find a single accidental hole, check where the hook entered and whether it caught all the loops needed for that stitch. If the stitch is wrong, unravel back to the error and remake it.
A common mistake is trying to close every visible space, even in an open stitch pattern. That can change the fabric and hide the pattern’s intended texture. Follow the stitch instructions before making a change.
For example, a pattern may place a chain space between groups of stitches. Leave that opening in place when the instructions call for it, even if nearby stitches look solid.
If the fabric curls instead of showing isolated holes, check its overall shape while it rests flat.
Why Is Your Crochet Fabric Curling?
If your fabric’s edges lift when you place it on a table, the piece may be curling. Lay it flat without stretching it, then compare its shape with the pattern.
Check whether the rows pull inward or the edge curls only in one area. A piece that draws up across its width may have tight stitches or an earlier row that changed shape.
Check whether tight stitches are pulling the edges inward
If the rows pull inward, compare their feel and size with earlier rows. Adjusting your tension or correcting an earlier row may help when the fabric draws up unintentionally.
Do not stretch the work to make it look flat during the check. Stretching can hide a curl and make it harder to see where the shape changes.
Check whether the pattern naturally curls
Some stitch structures create a natural curl, even when you follow the pattern. Compare your piece with the shape the pattern describes before treating every lifted edge as an error.
Blocking is a finishing method that can shape some fabrics. It does not replace missing stitches or fix an incorrect stitch count, so correct those issues first.
A piece with one curled corner may need a different check than a fabric whose full edge draws inward. Look at the whole shape and the row pattern before choosing a fix.
If the surface looks fuzzy or split as well as uneven, check how your hook catches the yarn.
Why Does Your Yarn Split While You Crochet?
Yarn splits when the hook catches only part of the strand instead of the full yarn. Pause and remake a split stitch with all plies caught before working onward.
Many yarns contain plies, or smaller strands twisted together. The hook can pass between those plies, leaving a partial strand caught in the stitch.
When you spot a split, stop and remove the hook carefully. Open the stitch enough to see the full strand, then remake it with the hook passing under all its plies.
Rotate the hook smoothly as you draw it through the loops, and check that its tip does not catch a single ply. A small change in working angle may help the hook catch the whole strand.
Pulling a partial strand tight is a common mistake. Undo that stitch first, since tightening the split can leave the yarn damaged or make the stitch look unlike its neighbors.
A split strand can look like a missed stitch, but check whether the hook caught the full yarn before changing your stitch count. Then compare the stitch you made with the pattern’s instructions.
For a separate look at crochet ideas, visit Hooksylane on Pinterest.
What If You Are Working Into the Wrong Part of a Stitch?
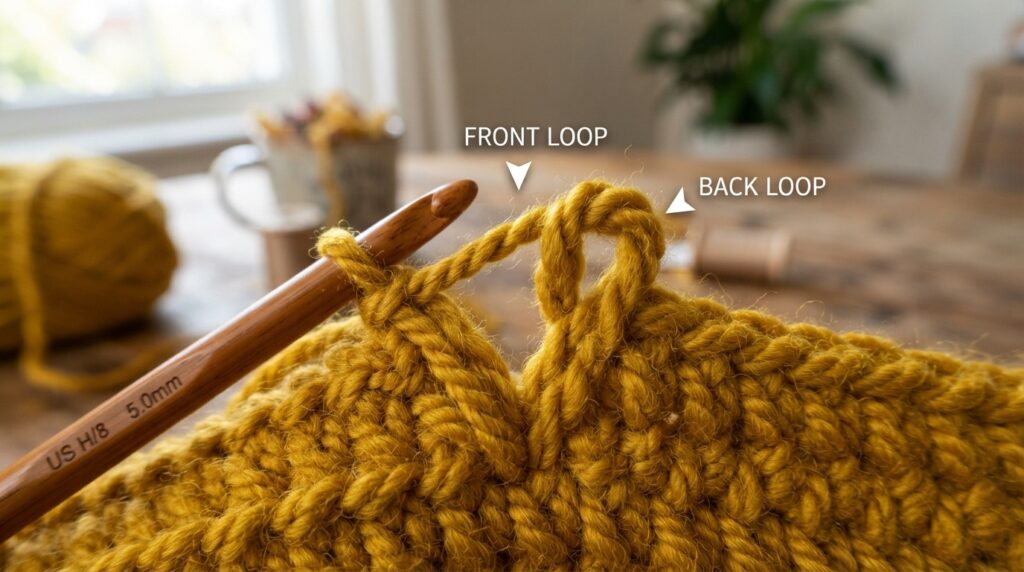
The pattern determines whether you work under both top loops or into a specified loop or space. Check the stitch instructions before choosing where the hook goes.
In common US crochet stitches, the top of a stitch forms a V. The hook normally goes under both loops of that V unless the pattern says otherwise.
Look for instructions to use both loops, the front loop, the back loop, or a named space. Follow those directions for each stitch, since a pattern can change the insertion point.
Working into the wrong part can change the fabric’s texture or shape. For example, a ribbed pattern may tell you to work through back loops to form ridges.
A common mistake is assuming every stitch uses the same insertion point. Check each pattern instruction, especially when the fabric’s texture changes or the row begins in a named space.
If the fabric does not look like the pattern, look at the top V before changing your tension. A stitch worked through one loop can look different from one worked through both.
Sometimes your stitches are formed correctly, but the finished piece still has the wrong size.
Why Does Your Crochet Project Look the Wrong Size?
A project can come out too large or small even when its stitches look regular, if its gauge differs from the pattern. Make and measure a swatch before continuing when the size is off.
Yarn, hook size, stitch size, and row height can all affect the finished measurements. Patterns commonly give gauge over a 4-inch (10 cm) area, but their stated measurement and stitch instructions take priority.
Use this four-step method to compare your work:
- Make a swatch using the pattern stitch.
- Measure the area stated in the pattern.
- Compare your stitch count and row count with its gauge.
- Change hook size or technique, then make another swatch.
Stitch gauge and row gauge measure different things. Stitch gauge counts stitches across an area; row gauge counts rows over that same area.
| Swatch result | Comparison with pattern | First adjustment | Recheck |
|---|---|---|---|
| Too many stitches in the measured area | Your stitches are smaller | Try a larger hook | Measure a new swatch |
| Too few stitches in the measured area | Your stitches are larger | Try a smaller hook | Measure a new swatch |
| Stitch count matches but row count differs | Row height does not match | Check row technique | Measure stitch and row gauge again |
More stitches in the same area means your stitches are smaller. Fewer stitches in that area means they are larger, even if the swatch looks neat.
If the stitch count matches but the row count differs, check the pattern’s row instructions and measure both counts again. Row height can differ from stitch width.
For help with a swatch and pattern measurements, use this half double crochet guide. Check its stitch instructions and compare your sample before changing your hook.
Use the checklist below to decide what to inspect before adding more rows.
Conclusion
A small pause can stop one crochet mistake from spreading across more rows. Check the work where it first changes, then choose the next step based on what you see.
Keep this checklist close while you work:
- Pause when the work first looks wrong.
- Compare the stitch count with the pattern.
- Inspect the first and last stitches.
- Check the turning-chain rule.
- Measure a swatch when the project size is off.
For your next step, work a short sample row and check it before continuing. Use the checklist on the next row you make.