
Christmas Seagull Crochet Pattern: Easy Christmas Bird Amigurumi
Table of Contents
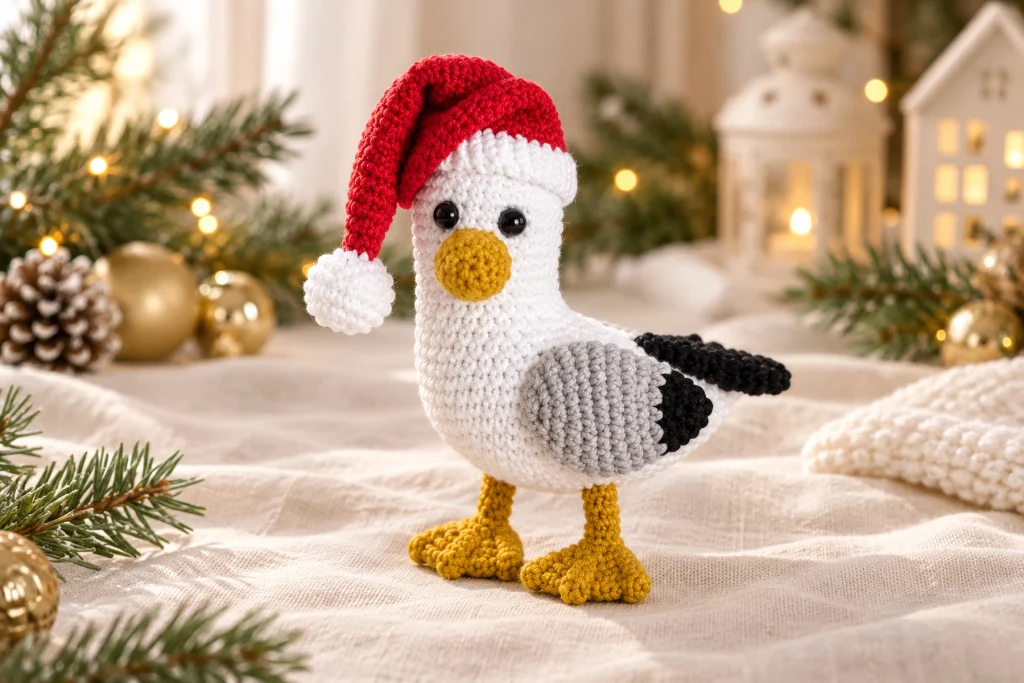
This Christmas seagull crochet pattern makes a cheerful white bird with a golden beak, webbed feet, gray-and-black wings, black tail feathers and a long red Santa hat. The project is small enough for a seasonal shelf display or hanging ornament, but detailed enough to feel special. Below you will find the complete pattern in US crochet terms plus yarn guidance, construction planning, eye placement, stuffing advice, assembly order, troubleshooting, safety notes and finishing ideas.
Christmas Seagull Pattern at a Glance
- Skill level: Confident beginner to intermediate.
- Finished size: About 6.3 in / 16 cm tall, 3.9 in / 10 cm wide and 2.8 in / 7 cm deep with the suggested materials.
- Construction: The head and body are one shaped piece; the beak, feet, wings, tail, hat and pom-pom are made separately.
- Main techniques: Magic ring, spiral rounds, increases, invisible decreases, skipped stitches, color changes, half double crochet and seaming.
- Estimated time: About 5-7 hours, including careful assembly.
Materials You Will Need

- 2.5 mm crochet hook, or the size that gives you a firm amigurumi fabric.
- Thin cotton or cotton-blend yarn: about 20 g white, plus about 5 g each of yellow, black, red and gray.
- Two 8 mm safety eyes, or black embroidery thread for embroidered eyes.
- Approximately 15 g of polyester toy stuffing.
- Approximately 6 in / 15 cm of gold cord or strong metallic thread for an optional hanging loop.
- Stitch marker, yarn needle, scissors, pins and a chopstick or stuffing tool.
Yarn and Gauge Advice
Gauge is not measured as a square for this amigurumi, but stitch density still matters. Work tightly enough that stuffing cannot show between stitches. Cotton gives crisp shaping and defined webbed feet, while acrylic makes a softer bird. If the fabric has visible gaps, move down one hook size. If your hands hurt or the fabric becomes rigid, move up by 0.25-0.5 mm. Use the same yarn weight for every color so the wings, beak and hat stay proportional.
US Crochet Abbreviations
| Abbreviation | Meaning |
|---|---|
| MR | magic ring |
| ch | chain |
| sc | single crochet |
| hdc | half double crochet |
| inc | 2 single crochets in the same stitch |
| dec | single crochet 2 stitches together; invisible decrease recommended |
| st(s) | stitch(es) |
| R | round |
| FO | fasten off |
Before You Start
- Work the head and body, beak, wings, tail and pom-pom in continuous spirals unless a section says otherwise.
- Move your stitch marker to the first stitch of every new round.
- Count after all shaping rounds. A missed increase can twist the bird’s profile.
- Use invisible decreases for a smoother surface.
- Leave long yarn tails on sewn parts and pin each component before attaching it.
- Read the special body-opening note before working Round 18.

Complete Christmas Seagull Crochet Pattern
Head and Body in White
Begin at the top of the head. The piece expands to 54 stitches, then Round 18 skips a central group of stitches to create the bent seagull body. Do not crochet into those 24 skipped stitches during that round.
R1: With white, work 6 sc in a MR. [6]
R2: Inc in each st around. [12]
R3: (Sc in next st, inc in next st) 6 times. [18]
R4: (Sc in next 2 sts, inc in next st) 6 times. [24]
R5: (Sc in next 3 sts, inc in next st) 6 times. [30]
R6: (Sc in next 4 sts, inc in next st) 6 times. [36]
R7: (Sc in next 5 sts, inc in next st) 6 times. [42]
R8: (Sc in next 6 sts, inc in next st) 6 times. [48]
R9: (Sc in next 7 sts, inc in next st) 6 times. [54]
R10-17: Sc in each st around. [54]
Eye placement: Insert the safety eyes between R25 and R26 with two visible stitch columns between them. Because the body turns after the skipped stitches, check the face from the front before locking the backs. For a baby or a child under three, embroider the eyes instead.
R18: Sc in next 15 sts, skip 24 sts, sc in next 15 sts. [30]
R19-30: Sc in each st around. [30]
After R18, gently pull the two active sides together so the 30 worked stitches form the new round. Continue spiraling over those 30 stitches. This creates the upright neck and rounded lower body. The unused span is closed neatly during finishing.
R31: (Sc in next 3 sts, dec) 6 times. [24]
R32: (Sc in next 2 sts, dec) 6 times. [18]
R33: (Sc in next st, dec) 6 times. [12]
R34: Dec 6 times. [6]
Stuff with small tufts as the opening narrows. Keep the head firm, the neck supported and the lower body evenly rounded. Cinch the final six stitches closed. Thread a yarn tail through the skipped opening, align the edges without flattening the body and close with small mattress stitches.
Beak in Yellow
R1: With yellow, work 6 sc in a MR. [6]
R2: Inc in each st around. [12]
R3-7: Sc in each st around. [12]
FO with a long tail. Add a small amount of stuffing so the beak holds its rounded shape without becoming oversized. Center it between the eyes and sew it across approximately head rounds 20-24. Check the side view before completing the seam.
Feet and Legs – Make Two in Yellow
R1: With yellow, ch 6 and join carefully to form a ring.
R2-6: Work 6 sc around. [6]
R7: Inc in each st around. [12]
R8: (Sc in next 2 sts, inc in next st) 4 times. [16]
R9: (Sc in next 3 sts, inc in next st) 4 times. [20]
R10-11: Sc in each st around. [20]
FO with a long tail. Fold the wider foot section in half and work 10 sc through both layers to create the flat webbed edge. The narrow tube forms the leg. Pin both legs to the lower body with about five visible stitches between them, then sew around the top of each leg. Make sure the bird can stand before securing the final knots.
Wings – Make Two
R1: With black, work 6 sc in a MR. [6]
R2: Sc in each st around. [6]
R3: Inc in each st around. [12]
R4: Sc in each st around. [12]
R5: Change to gray; (sc in next st, inc in next st) 6 times. [18]
R6: Sc in each st around. [18]
R7: (Sc in next 2 sts, inc in next st) 6 times. [24]
R8-11: Sc in each st around. [24]
R12: (Sc in next 2 sts, dec) 6 times. [18]
R13: (Sc in next st, dec) 6 times. [12]
R14: Dec 6 times. [6]
FO and cinch the remaining stitches. Do not stuff the wings. Flatten each wing so the black tip sits toward the tail, then pin the wings between body rounds 9 and 15. Mirror their angle and sew around the gray edge while leaving the black tip slightly dimensional.
Black Tail Feathers
R1: With black, work 6 sc in a MR. [6]
R2: Inc in each st around. [12]
R3: (Sc in next st, inc in next st) 6 times. [18]
R4: (Sc in next 2 sts, inc in next st) 6 times. [24]
R5: (Sc in next 3 sts, inc in next st) 6 times. [30]
R6: Fold the circle in half and sc through both layers across 15 sts. [15]
FO with a long tail. Position the folded half-circle at the back of the bird with the straight edge against the body and the rounded tips pointing away. Sew it securely beneath the wing tips.
Santa Hat
R1: With white, ch 30, join without twisting and work in rounds. [30]
R2-3: Hdc in each st around. [30]
R4: Change to red; (sc in next 8 sts, dec) 3 times. [27]
R5-6: Sc in each st around. [27]
R7: (Sc in next 7 sts, dec) 3 times. [24]
R8-10: Sc in each st around. [24]
R11: (Sc in next 6 sts, dec) 3 times. [21]
R12-14: Sc in each st around. [21]
R15: (Sc in next 5 sts, dec) 3 times. [18]
R16-17: Sc in each st around. [18]
R18: (Sc in next 4 sts, dec) 3 times. [15]
R19-20: Sc in each st around. [15]
R21: (Sc in next 3 sts, dec) 3 times. [12]
R22-23: Sc in each st around. [12]
R24: (Sc in next 2 sts, dec) 3 times. [9]
R25-26: Sc in each st around. [9]
R27: (Sc in next st, dec) 3 times. [6]
R28: Sc in each st around. [6]
FO, thread through the final six stitches and cinch closed. The first three white rounds form the brim; the red section tapers gradually into the long point. Weave in the color-change tails on the wrong side.
White Pom-Pom
R1: With white, work 6 sc in a MR. [6]
R2: Inc in each st around. [12]
R3: (Sc in next st, inc in next st) 6 times. [18]
R4-6: Sc in each st around. [18]
R7: (Sc in next st, dec) 6 times. [12]
R8: Dec 6 times. [6]
Stuff lightly before the final decrease round. FO with a long tail and attach the pom-pom to the tip of the hat. It should remain round and soft rather than tightly packed.
Best Assembly Order
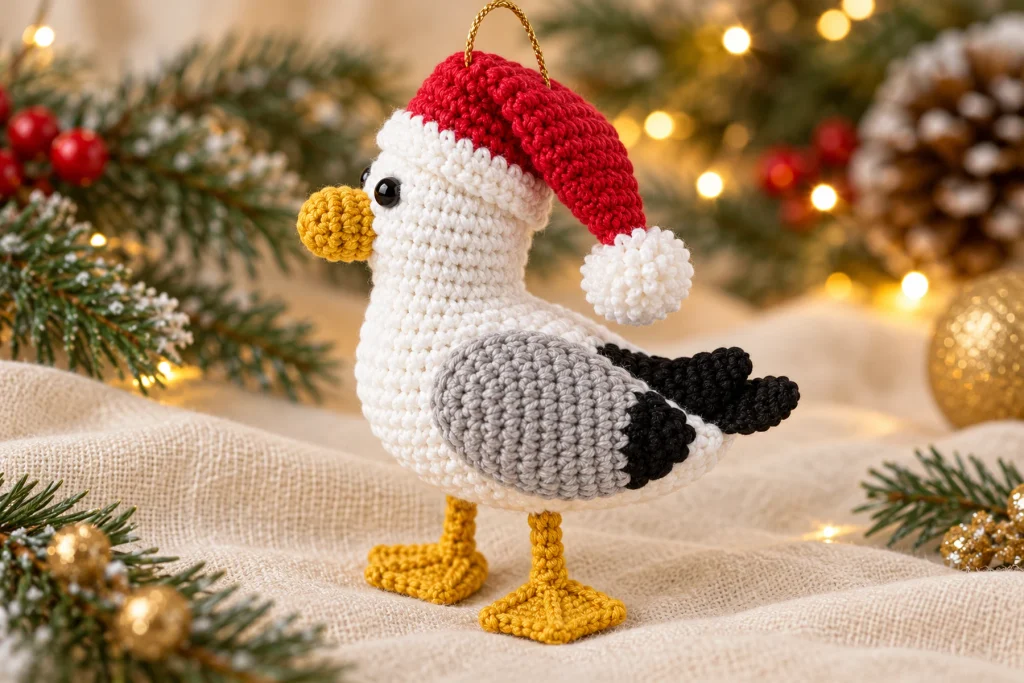
- Close and shape the head-body opening, then finish stuffing.
- Attach the beak and confirm that the face is centered.
- Pin and sew the two feet, checking that the bird stands level.
- Attach the folded tail at the center back.
- Mirror and sew the wings between body rounds 9 and 15.
- Place the hat over the head and sew the white brim to the head with hidden stitches.
- Bend the red point to one side and anchor it with two or three small stitches.
- Sew on the pom-pom and add the optional gold hanging loop through the top of the hat.
How to Make the Hanging Loop Securely
Use strong cord rather than decorative thread that breaks easily. Pass the cord through the hat and into the stuffed head so the weight is supported by the toy, not only by the hat fabric. Tie the ends together inside or beneath the hat and test the loop by holding it for several seconds over a soft surface. This loop is decorative; never use it near a crib, playpen or sleeping child.
Troubleshooting the Pattern
The Body Looks Twisted After Round 18
Confirm that you worked 15 stitches, skipped exactly 24 and worked the final 15. The new working round must contain 30 stitches. Use clips to bring the two worked sections together before continuing. A slight spiral lean is normal in continuous crochet and can be corrected while stuffing.
Stuffing Shows Through the White Yarn
Use smaller tufts and a smaller hook. White stitches reveal gaps more easily than darker colors, so avoid forcing large clumps through the fabric. A smooth white or cream stuffing is preferable.
The Bird Will Not Stand
Before sewing, place the bird on a flat surface and adjust the distance and angle of both legs. Keep the lower body firm and distribute stuffing evenly. If necessary, tack the backs of the feet lightly toward the body so their flat edges contact the surface.
The Wings Do Not Match
Both wings use the same instructions, but the color-change jog can make them appear different. Rotate the second wing so its jog faces the body. Pin at equal heights and compare the bird from above before sewing.
The Hat Is Too Loose or Too Tight
Test the 30-stitch brim around the head after Round 3. If it is too loose, use a slightly smaller hook for the hat. If it is too tight, add stitches in multiples of three and preserve the same gradual decrease rhythm, or sew the brim only along the back half of the head.
Safe Finishing and Care
Plastic safety eyes are not suitable for children under three and cannot be guaranteed never to loosen. Use securely embroidered eyes for a baby-safe version. Keep the gold hanging loop off toys intended for play. Weave every tail through several directions, inspect all seams and remove pins before gifting. Spot clean the finished bird with cool water and mild soap. If your yarn permits washing, place the toy in a mesh bag, use a gentle cycle and air-dry completely.
Customization Ideas
- Make a coastal palette with cream, navy and mist gray.
- Use a green hat for an elf seagull or omit the hat for a year-round bird.
- Embroider a tiny holly leaf on the white brim.
- Add a name and year to a small fabric tag for a keepsake ornament.
- Crochet several birds in different hat colors for a handmade mantel collection.
More Crochet Inspiration from HooksyLane
Browse more amigurumi crochet patterns, discover seasonal projects in free crochet patterns, or strengthen your technique with the HooksyLane crochet learning guides. Save this tutorial and follow HooksyLane on Pinterest for visual project ideas. Printable crochet resources are available in the HooksyLane Gumroad store.
Final Quality Checklist
- The final body round has six stitches and is closed securely.
- The beak is centered beneath the eyes.
- The feet are level and separated by about five visible stitches.
- The gray wings sit at the same height with black tips toward the tail.
- The tail is centered and does not pull the body backward.
- The hat brim is secure, the point is anchored and the pom-pom is firmly sewn.
- All pins are removed and yarn tails are hidden.
- Safety eyes and hanging cord are omitted when the recipient’s age requires it.
This Christmas seagull crochet pattern is most successful when you slow down at Round 18, count the new 30-stitch body carefully and pin every separate part before sewing. Those small checks create a balanced seagull with a friendly face, stable feet and a polished holiday finish.